Mastering Scree Plots: A Step-by-Step Guide to Selecting the Optimal Number of Principal Components for Biomedical Data
This article provides a comprehensive guide for researchers, scientists, and drug development professionals on using scree plots to determine the optimal number of principal components in Principal Component Analysis (PCA).
Mastering Scree Plots: A Step-by-Step Guide to Selecting the Optimal Number of Principal Components for Biomedical Data
Abstract
This article provides a comprehensive guide for researchers, scientists, and drug development professionals on using scree plots to determine the optimal number of principal components in Principal Component Analysis (PCA). Covering foundational theory, practical implementation, and advanced validation techniques, it addresses the critical challenge of dimensionality reduction in high-dimensional biomedical datasets, such as those from genomic, transcriptomic, and clinical studies. The content bridges statistical methodology with real-world application, enabling professionals to enhance model performance, avoid overfitting, and extract meaningful biological insights from complex data.
Understanding the Why: The Core Principles of PCA and the Role of the Scree Plot
The curse of dimensionality describes a set of phenomena that arise when analyzing and organizing data in high-dimensional spaces, which do not occur in low-dimensional settings. In biomedical research, this concept has become increasingly critical with the proliferation of high-throughput technologies that generate vast amounts of features (dimensions) per observation. Patient health states can now be characterized by multimodal data streams including medical imaging, clinical variables, genome sequencing, clinician-patient conversations, and continuous signals from wearables [1]. This high-volume, personalized data aggregated over patients' lives has spurred development of artificial intelligence models for higher-precision diagnosis, prognosis, and tracking.
The fundamental challenge emerges when the number of features (p) becomes very large, often exceeding the sample size (n), creating what statisticians call "small n, large p" problems. As dimensionality increases, the available data becomes sparse in the corresponding feature space, with potentially catastrophic consequences for model generalizability. This sparsity creates "dataset blind spots"—contiguous regions of feature space without any observations—which can lead to highly variable estimates of true model performance and unexpected failures when deployed in real-world clinical settings [1]. The curse of dimensionality thus represents a rate-limiting factor in developing robust AI models that generalize reliably beyond their training data.
Theoretical Foundations and Mathematical Principles
The Geometry of High-Dimensional Spaces
The curse of dimensionality manifests through several counterintuitive geometric properties. As dimensionality increases, the volume of the space grows exponentially, causing data points to become increasingly sparse. This sparsity undermines the concept of proximity that many statistical and machine learning algorithms rely upon. In high dimensions, most data points reside in the outskirts of the feature space, and the average distance between points becomes large and homogeneous [1].
The combinatorial explosion of possible feature value combinations means that fewer individuals are close to average for many measurements simultaneously than for any single measurement alone [2]. This phenomenon explains why designing airplane cockpits for the "average pilot" across multiple body measurements failed—virtually no pilots were average across all dimensions. Similarly, in precision medicine, a patient with 10 independent risk factors each with 10% prevalence implies a probability of only 1 in 10 billion of finding a similar previous patient for comparison [2].
Implications for Statistical Inference
High-dimensional spaces present fundamental challenges for statistical inference. The large feature space increases the risk of overfitting, where models learn patterns specific to the training data that do not generalize. This occurs because with limited samples in high dimensions, algorithms can appear to find "patterns" that are actually statistical artifacts [1].
The Watson for Oncology case exemplifies this problem—trained on high-dimensional historical patient data but with small sample sizes ranging from 106 cases for ovarian cancer to 635 cases for lung cancer, the system proved susceptible to dataset blind spots and produced incorrect treatment recommendations when encountering data from these blind spots post-deployment [1].
Manifestations in Biomedical Data Types
Genomic Data
Genomic selection represents a prime example where high-dimensional data challenges emerge. The development of high-throughput genotyping technologies has yielded dense genomic marker data, often comprising tens of thousands of single nucleotide polymorphisms (SNPs) [3]. With typical study sample sizes of a few hundred individuals, genomic prediction must estimate large numbers of marker effects (p) using limited observations (n).
Table 1: Dimensionality Challenges in Genomic Studies
| Data Characteristic | Typical Scale | Dimensionality Challenge |
|---|---|---|
| Number of markers (SNPs) | 26,000+ [3] | Far exceeds sample size |
| Sample size | 315 lines [3] | Small n, large p problem |
| Environmental factors | Multiple environments | Increases complexity through G×E interactions |
| Prediction accuracy | Varies with DR method | Plateaus with fraction of features [3] |
Clinical and Digital Health Data
Digital health data presents particularly challenging high-dimensional scenarios. Medical imaging like MRI brain scans contains sub-mm resolution, leading to data with a million or more voxels. Continuous wearable device data samples at tens or hundreds of samples per second, while speech signals sample between 16k-44k samples per second [1]. These data streams create massive clinical data footprints with highly complex information.
In speech-based digital biomarker discovery, researchers transform raw speech samples into high-dimensional feature vectors containing hundreds to thousands of features to detect neurological diseases. However, clinical speech databases typically contain only tens or hundreds of patients, creating the "perfect storm" of high-dimensional data with small sample size used to model complex phenomena [1].
Dimensionality Reduction Methodologies
Principal Component Analysis (PCA) Fundamentals
Principal Component Analysis stands as one of the most widely used dimensionality reduction techniques in biomedical research. PCA transforms a complex dataset with many variables into a simpler one that retains critical trends and patterns by identifying principal components—directions that maximize variance and are orthogonal to each other [4] [5].
The algorithm follows a systematic process:
- Standardization: Normalizing data so each variable contributes equally
- Covariance Matrix Computation: Understanding how variables deviate from mean and correlate
- Eigenvectors and Eigenvalues Identification: Finding new axes that maximize variance
- Sorting and Ranking: Prioritizing components by variance capture ability
- Feature Vector Formation: Selecting subset of eigenvectors as principal components
- Transformation: Mapping original data into principal component space [5]
Determining the Optimal Number of Principal Components
Selecting the correct number of principal components represents a critical hyperparameter tuning process in PCA. Multiple methods exist for this determination, each with distinct advantages:
Table 2: Methods for Selecting Optimal Number of Principal Components
| Method | Description | Application Context |
|---|---|---|
| Scree Plot | Visual identification of "elbow" where eigenvalues drop off [6] | Exploratory data analysis |
| Variance Threshold | Specifying float (0-1) for variance to retain [4] | When specific variance retention needed |
| Kaiser's Rule | Retaining components with eigenvalues >1 [4] [6] | Initial screening, tends to overestimate |
| Parallel Analysis | More accurate than scree plot or Kaiser's rule [6] | When accuracy critical |
| Performance Metrics | Using RMSE (regression) or Accuracy (classification) [4] | When downstream model performance paramount |
The scree plot method, central to the thesis context of this article, involves creating a visual representation of eigenvalues that define the magnitude of eigenvectors (principal components). Researchers select all components up to the point where the bend (elbow) occurs in the scree plot [4]. For genomic prediction applications, studies show that regardless of the dimensionality reduction method and prediction model used, only a fraction of features is sufficient to achieve maximum correlation [3].
Experimental Protocol: PCA with Scree Plot Analysis
Objective: Implement PCA with scree plot analysis for dimensionality reduction in high-dimensional genomic data.
Materials:
- Genomic dataset (e.g., SNP markers)
- Computing environment with linear algebra capabilities
- Visualization tools for scree plot generation
Procedure:
- Standardize the input data to have zero mean and unit variance
- Compute covariance matrix of standardized data
- Calculate eigenvectors and eigenvalues from covariance matrix
- Sort eigenvectors by decreasing eigenvalues
- Plot ordered eigenvalues (scree plot)
- Identify the "elbow" point where eigenvalues drop off markedly
- Select principal components up to the elbow point
- Transform original data to reduced dimensional space
Validation:
- Compare explained variance ratio for selected components
- Evaluate downstream model performance with cross-validation
- Assess computational efficiency gains
Advanced Dimensionality Reduction Techniques
Feature Selection vs. Feature Projection
Dimensionality reduction techniques broadly fall into two categories: feature selection and feature projection. Feature selection methods identify and retain the most relevant features, reducing complexity while maintaining interpretability. These include embedded methods (LASSO regularization), filters (statistical measures), and wrappers (feature subset evaluation) [5].
Feature projection techniques transform data into lower-dimensional space, maintaining essential structures while reducing complexity. These include manifold learning (t-SNE, UMAP), principal component analysis (PCA), linear discriminant analysis (LDA), and autoencoders [5]. For genomic prediction, feature selection approaches often prove preferable as they avoid interpretability issues associated with linear combinations of original features [3].
Comparative Analysis of Dimensionality Reduction Methods
Table 3: Dimensionality Reduction Techniques for Biomedical Data
| Method | Type | Key Characteristics | Biomedical Applications |
|---|---|---|---|
| PCA | Feature projection | Linear, maximizes variance | Genomic prediction, imaging data |
| t-SNE | Manifold learning | Non-linear, preserves local structure | Single-cell RNA sequencing, visualization |
| UMAP | Manifold learning | Preserves local/global structure, scalable | Large-scale biomedical data |
| LDA | Feature projection | Supervised, maximizes class separation | Diagnostic classification |
| Autoencoders | Neural network | Non-linear, deep learning approach | Complex pattern recognition |
| Feature Selection | Feature selection | Maintains original feature interpretability | Genomic marker selection |
Research demonstrates that in genomic selection, dimensionality reduction methods significantly improve computational efficiency while maintaining prediction accuracy. Studies applying DR methods to chickpea genomic data containing 315 lines phenotyped in nine environments with 26,817 markers showed that only a fraction of features was sufficient to achieve maximum correlation, regardless of the DR method and prediction model used [3].
The Scientist's Toolkit: Research Reagent Solutions
Table 4: Essential Research Reagents and Computational Tools
| Item | Function | Application Note |
|---|---|---|
| High-Throughput Genotyping Platform | Generates dense SNP array data | Foundation for genomic selection studies [3] |
| Scikit-learn PCA Implementation | Python-based PCA with hyperparameter tuning | Enables n_components optimization [4] |
| R Statistical Environment with factoextra | Scree plot visualization and eigenvalue analysis | Provides fviz_eig() for variance plots [4] |
| Parallel Analysis Algorithms | Determines significant components beyond eigenvalue >1 | More accurate than Kaiser's rule [6] |
| Cross-Validation Framework | Estimates out-of-sample performance | Critical for evaluating generalizability [1] |
| Manifold Learning Libraries (UMAP, t-SNE) | Non-linear dimensionality reduction | Handles complex biomedical data structures [5] |
Implementation Protocols for Biomedical Applications
Protocol: Genomic Prediction with Dimensionality Reduction
Objective: Implement dimensionality reduction as pre-processing step for genomic selection models to improve computational efficiency.
Background: Genomic selection must estimate large numbers of marker effects using limited observations, complicated by environment and genotype by environment (G×E) interactions [3].
Materials and Reagents:
- Plant or animal lines with genotype and phenotype data
- Genotyping platform for SNP markers
- Computing resources for large-scale matrix operations
Procedure:
- Data Preparation
- Collect genotype data (e.g., 26,817 SNP markers [3])
- Acquire phenotype measurements across multiple environments
- Format data into marker matrix and response variables
Dimensionality Reduction Application
- Apply selected DR method (PCA, feature selection, etc.)
- Create reduced datasets with increasing marker numbers
- Compute respective prediction accuracy for each size
Model Training and Validation
- Implement genomic prediction models (GBLUP, Bayesian methods)
- Incorporate environment and G×E interaction effects
- Apply cross-validation scheme appropriate for data structure
Performance Evaluation
- Calculate prediction accuracy as correlation between predicted and observed
- Plot accuracy versus number of features retained
- Identify point where accuracy plateaus
Expected Outcomes: Prediction accuracy values plateau beyond a certain feature set size, with further increases providing no significant improvement [3].
Protocol: Digital Biomarker Development with Speech Analysis
Objective: Develop AI models for neurological disease detection from speech signals while mitigating curse of dimensionality effects.
Background: Speech production involves distributed neuronal activation, with disturbances from neurological disease manifesting as signal changes. Speech signals sampled at high frequencies create high-dimensional feature spaces [1].
Procedure:
- Data Acquisition
- Collect speech samples according to standardized protocol
- Include participants with target condition (e.g., MCI) and healthy controls
- Record minimum of several minutes of speech per participant
Feature Extraction
- Transform raw speech samples into feature vectors
- Include features like type-to-token ratio (TTR) and lexical density (LD)
- Normalize features to common scale (e.g., 0-1)
Dimensionality Assessment
- Evaluate feature space sparsity
- Identify dataset blind spots in relevant feature space
- Apply dimensionality reduction appropriate for sample size
Model Development with Generalizability Testing
- Train multiple model architectures on available data
- Evaluate performance on held-out test set
- Implement robustness checks for blind spot regions
Critical Considerations: Small clinical speech databases (tens to hundreds of participants) with high-dimensional features create ideal conditions for the curse of dimensionality [1].
The curse of dimensionality presents fundamental challenges in biomedical research as data dimensionality continues to grow with technological advances. The phenomenon of dataset blind spots and performance misestimation requires methodological approaches that prioritize generalizability over training set performance. Dimensionality reduction techniques, particularly those incorporating scree plot analysis for optimal component selection, offer powerful strategies to mitigate these effects.
Future directions in biomedical research will likely incorporate more sophisticated approaches to the dimensionality challenge. Advanced Inferential Medicine frameworks that use "modelbases" rather than solely relying on ever-larger databases represent promising alternatives [2]. Similarly, randomized algorithms for dimensionality reduction may provide computational advantages for massive-scale biomedical data [3]. As precision medicine advances, recognizing and addressing the cursed dimensions will be essential for translating high-dimensional data into clinically meaningful insights.
In multivariate statistics and dimensionality reduction, a scree plot serves as a fundamental graphical tool for determining the optimal number of components to retain in Principal Component Analysis (PCA). PCA is a linear dimensionality reduction technique that transforms high-dimensional data into a set of linearly uncorrelated variables called principal components, which capture the maximum variance in the data [7] [8]. The scree plot, first introduced by Raymond B. Cattell in 1966, provides researchers with a visual method to balance information retention against model simplicity [9].
The plot derives its name from the geological term "scree," referring to the accumulation of loose stones or rocky debris that forms at the base of a mountain slope [9]. This analogy perfectly captures the visual appearance of a typical scree plot: a steep descent followed by a gradual "rubble" of less significant components. For researchers in drug development and other scientific fields working with high-dimensional data, the scree plot offers an intuitive approach to one of PCA's most critical challenges—determining how many principal components effectively capture the essential patterns in their data without overfitting or unnecessary complexity.
Theoretical Foundation: Eigenvalues and Variance Explained
Principal Components and Eigenvalues
Principal components are new variables constructed as linear combinations of the original variables in a dataset [8]. These components are calculated in sequence such that:
- The first principal component (PC1) accounts for the largest possible variance in the data
- The second principal component (PC2) accounts for the next highest variance while being uncorrelated (orthogonal) to the first
- Each subsequent component follows the same pattern, explaining remaining variance while maintaining orthogonality to previous components [8] [10]
Eigenvalues represent the amount of variance carried by each principal component [11]. Mathematically, if we have a data matrix (X) with covariance matrix (Σ), the eigenvalues (λ_i) are obtained through eigen decomposition of (Σ) and satisfy the equation:
[Σvi = λiv_i]
where (v_i) are the eigenvectors (principal components). The size of each eigenvalue corresponds directly to the importance of its associated principal component—larger eigenvalues indicate components that capture more substantial portions of the total variance in the dataset [8].
Variance Explained Calculation
The proportion of variance explained by each principal component is calculated by dividing its eigenvalue by the sum of all eigenvalues [8]:
[\text{Proportion of Variance for PC}i = \frac{λi}{\sum{j=1}^{p} λj}]
where (p) equals the total number of variables (and components) in the original dataset.
The cumulative variance explained by the first (k) components is:
[\text{Cumulative Variance} = \frac{\sum{j=1}^{k} λj}{\sum{j=1}^{p} λj}]
This cumulative measure helps researchers determine what percentage of the original information is preserved when retaining (k) components [11].
Table 1: Sample Eigenanalysis Results from a PCA Study [11]
| Principal Component | Eigenvalue | Proportion of Variance | Cumulative Proportion |
|---|---|---|---|
| PC1 | 3.5476 | 0.443 | 0.443 |
| PC2 | 2.1320 | 0.266 | 0.710 |
| PC3 | 1.0447 | 0.131 | 0.841 |
| PC4 | 0.5315 | 0.066 | 0.907 |
| PC5 | 0.4112 | 0.051 | 0.958 |
| PC6 | 0.1665 | 0.021 | 0.979 |
| PC7 | 0.1254 | 0.016 | 0.995 |
| PC8 | 0.0411 | 0.005 | 1.000 |
Visual Interpretation of Scree Plots
Anatomy of a Scree Plot
A scree plot displays eigenvalues on the y-axis against the corresponding principal component number on the x-axis [7] [9]. The components are always arranged in descending order of their eigenvalues, creating a characteristic downward curve [7].
Most scree plots share a common visual pattern: starting high on the left, falling rather quickly, and then flattening out at some point [7]. This distinctive shape emerges because the first component typically explains much of the variability, the next few components explain a moderate amount, and the latter components explain only a small fraction of the overall variability [7].
The Elbow Criterion
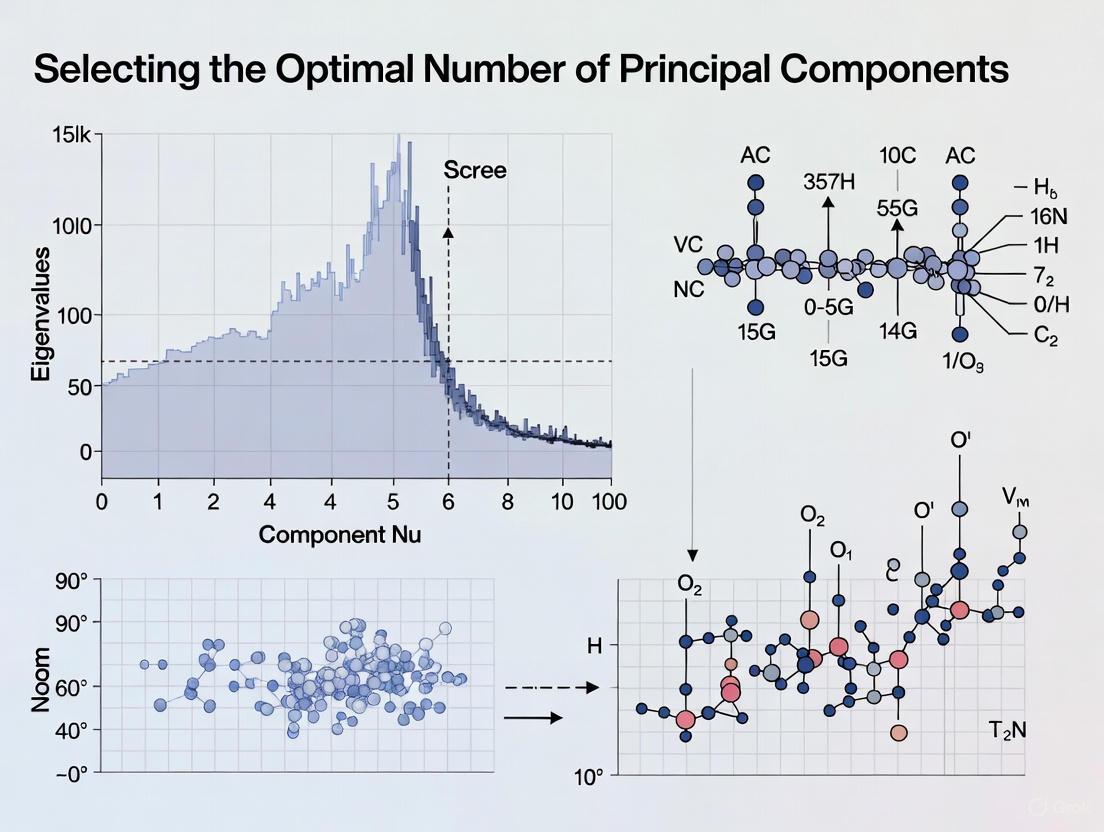
The primary interpretation method for scree plots is the elbow criterion, which involves identifying the point where the curve bends—the "elbow"—and selecting all components just before this flattening occurs [7] [9]. According to the scree test, the "elbow" of the graph represents where the eigenvalues seem to level off, and factors or components to the left of this point should be retained as significant [9].
When the eigenvalues drop dramatically in size, it indicates that an additional factor would add relatively little to the information already extracted [7]. In the example provided in Table 1, the scree plot would show a distinct elbow after the third principal component, suggesting that three components effectively capture the essential variance in the data while the remaining components contribute minimally [11].
Methodological Protocols for Scree Plot Analysis
Standard PCA and Scree Plot Generation Workflow
Step-by-Step Experimental Protocol
Protocol 1: Comprehensive Scree Plot Analysis for Component Selection
Data Standardization
- Standardize the range of continuous initial variables by subtracting the mean and dividing by the standard deviation for each value of each variable [8] [10]
- Purpose: Ensures each variable contributes equally to the analysis and prevents variables with larger ranges from dominating those with smaller ranges [8]
Covariance Matrix Computation
Eigen Decomposition
Scree Plot Generation
Component Selection
Data Transformation (Optional)
Complementary Component Selection Methods
Alternative and Supporting Criteria
While the scree plot provides a visual method for component selection, researchers often combine it with quantitative approaches for more robust results:
- Kaiser's Rule: Retain components with eigenvalues greater than 1 [7] [4]
- Proportion of Variance Criterion: Select components that collectively explain at least 80-90% of the total variance [7] [11]
- Parallel Analysis: Compare data eigenvalues with those from uncorrelated normal variables, retaining components where data eigenvalues exceed random eigenvalues [6]
Table 2: Comparison of Component Selection Methods [7] [11] [6]
| Method | Procedure | Advantages | Limitations |
|---|---|---|---|
| Scree Plot (Elbow Criterion) | Visual identification of slope change in eigenvalue plot | Intuitive, graphical, widely applicable | Subjective interpretation, multiple elbows possible |
| Kaiser's Rule | Retain components with eigenvalues > 1 | Simple, objective criterion | Often overestimates components, too conservative for large variable sets |
| Variance Proportion | Retain components until cumulative variance reaches threshold (e.g., 80-90%) | Direct control over information retention | Does not consider component significance, may include trivial components |
| Parallel Analysis | Compare with eigenvalues from random uncorrelated data | Objective, based on statistical significance | Requires simulation, more computationally intensive |
Integrated Decision Framework
For robust component selection, researchers should:
- Generate scree plot and identify potential elbow points [7] [9]
- Apply Kaiser's rule to determine minimum components to retain [4]
- Calculate cumulative variance explained by components before the elbow [11]
- Compare with parallel analysis results if available [6]
- Consider domain knowledge and analysis objectives for final decision [4]
In Table 1, despite three components having eigenvalues >1 (Kaiser's Rule), the scree plot might suggest that only two components represent the true elbow, demonstrating how these methods can yield different recommendations that require researcher judgment [11].
Practical Applications in Scientific Research
Drug Development and Biomarker Discovery
Scree plots play a crucial role in pharmaceutical research where high-dimensional data is prevalent:
- Genomic and Transcriptomic Data: PCA with scree plot analysis helps reduce dimensionality from thousands of genes to manageable components while preserving biological signal [12]
- Proteomic Profiling: Identifying major patterns in protein expression data for biomarker discovery [13]
- Chemical Compound Analysis: Analyzing spectroscopic data to identify major molecular components in drug formulations [14]
For example, in a study predicting breast cancer using PCA with logistic regression, scree plot analysis helped determine the optimal number of components to retain from six clinical and radiological features, including mean radius, texture, perimeter, and area of breast lumps [10].
Data Visualization and Exploration
When the primary goal of PCA is data visualization, researchers typically select exactly 2 or 3 principal components regardless of the elbow position, as these can be directly visualized in 2D or 3D plots [4]. This approach sacrifices statistical optimality for interpretability, allowing researchers to identify clusters, outliers, and patterns in complex datasets.
Troubleshooting and Methodological Considerations
Common Challenges in Scree Plot Interpretation
- Multiple Elbows: Some scree plots exhibit several points where the slope changes, making elbow identification ambiguous [9]
- Gradual Slope Transitions: Without a clear elbow, the scree plot may show a smooth, gradual decline, providing no obvious cutoff point [7]
- Subjectivity: Different researchers may identify different elbow points in the same scree plot [9]
Solutions and Advanced Approaches
- Kneedle Algorithm: Computational method that automatically detects knees (elbows) in curves by finding points of maximum curvature [9]
- Combined Criteria: Using scree plots alongside other methods like parallel analysis or variance thresholds [6] [4]
- Validation Techniques: Assessing stability of component selection through cross-validation or bootstrap methods [6]
Essential Research Reagent Solutions
Table 3: Key Computational Tools for Scree Plot Analysis
| Tool/Software | Application Context | Key Functions | Implementation Example |
|---|---|---|---|
| R Statistical Software | General statistical analysis | Comprehensive PCA and visualization | plot(fit <- princomp(mydata, cor=TRUE)) [6] |
| Python Scikit-learn | Machine learning applications | PCA with automated variance calculation | PCA(n_components=0.85) # keeps 85% variance [4] |
| factoextra R Package | Enhanced visualization | Specialized scree plot generation | fviz_eig(pca_model, addlabels=TRUE) [4] |
| SpectroChemPy | Spectroscopic data analysis | Domain-specific PCA implementation | pca.screeplot() [14] |
| MATLAB | Engineering and signal processing | Matrix computations and eigenanalysis | Minka's PCA dimensionality toolbox [6] |
Scree plots remain an essential tool in the multivariate analysis toolkit, providing researchers across scientific domains with a visually intuitive method for determining the optimal number of components in PCA. While the technique has acknowledged limitations regarding subjectivity, when combined with complementary criteria like Kaiser's rule and parallel analysis, it offers a robust framework for balancing information retention with model parsimony.
For drug development professionals and researchers working with high-dimensional biological data, mastering scree plot interpretation represents a critical skill in the era of big data analytics. By following the standardized protocols outlined in this article and leveraging the appropriate computational tools, scientists can make informed decisions about component selection that enhance the validity and interpretability of their multivariate analyses.
Historical Origins and Theoretical Foundations
The scree plot, a cornerstone of multivariate statistics, was introduced by Raymond B. Cattell in 1966 in his seminal paper, "The Scree Test For The Number Of Factors," published in Multivariate Behavioral Research [15] [9]. This graphical tool was designed to address a fundamental challenge in exploratory factor analysis (EFA) and principal component analysis (PCA): determining the optimal number of components or factors to retain from a dataset [15] [9].
Cattell coined the term "scree" from the geological word for the accumulation of loose stones or debris at the base of a mountain cliff [15]. He provided the following rationale for the name:
"Such a plot falls first in a steep curve but then straightens out in a line which runs with only trivial and irregular deviations from straightness to the nth factor… This straight end portion we began calling the scree—from the straight line of rubble and boulders which forms at the pitch of sliding stability at the foot of a mountain. The initial implication was that this scree represents a 'rubbish' of small error factors" [15].
The theoretical underpinning of the scree test is that the variance in observed data can be partitioned into two distinct parts: common variance and unique variance. Cattell proposed that the scree plot visually separates the few major factors or components (the "mountain") that represent common variance shared across multiple variables from the numerous minor factors (the "scree") that represent unique or error variance specific to individual variables [15] [16]. This conceptual framework provides a principled approach for distinguishing psychologically or scientifically meaningful factors from those attributable to random error or measurement specificity.
The Scree Test in Principal Component Analysis
Relationship between PCA and Scree Plots
Principal Component Analysis (PCA) is a linear dimensionality reduction technique that transforms data to a new coordinate system, with the first principal component capturing the largest variance in the data, the second the next largest, and so on [17]. The scree plot serves as a critical diagnostic tool in PCA by visualizing the eigenvalues associated with each successive component, which represent the magnitude of variance each component explains [11] [9].
The fundamental connection between PCA and scree plots lies in how eigenvalues are calculated and interpreted. In PCA, eigenvalues are derived from the covariance or correlation matrix of the data and represent the variances of the principal components [17] [11]. The scree plot graphically displays these eigenvalues in descending order, allowing researchers to identify the point where the explained variance drops off markedly [9].
Visualizing the Scree Test Logic
The following diagram illustrates the logical workflow and decision process when applying Cattell's scree test to determine the number of principal components to retain.
Figure 1: Logical workflow for applying Cattell's scree test in PCA
Quantitative Framework for Component Selection
The scree test operates within a specific quantitative framework where eigenvalues serve as the fundamental metric for decision-making. The following table summarizes key statistical measures used in conjunction with scree plots for component selection.
Table 1: Key Quantitative Metrics in PCA and Scree Plot Interpretation
| Metric | Calculation | Interpretation in Scree Plot | Role in Component Selection |
|---|---|---|---|
| Eigenvalue | Variance of each principal component [11] | Y-axis value; represents "size" of each component [4] [11] | Components with larger eigenvalues are more meaningful; Kaiser criterion suggests retaining eigenvalues >1 [11] |
| Proportion of Variance | (Eigenvalue / Total Variance) × 100 [11] | Height of each bar in a variance explained plot [4] | Indicates individual contribution of each component to total variance explained [11] |
| Cumulative Variance | Sum of proportions up to current component [11] | Step-line in a cumulative variance plot [4] | Helps determine if retained components explain sufficient total variance (often 70-90%) [11] |
| Component Number | Sequence of components (1 to p) | X-axis value; ordered from largest to smallest eigenvalue [9] | Determines position relative to "elbow"; components before elbow are retained [9] |
Practical Application and Protocol
Step-by-Step Experimental Protocol
The following protocol provides a detailed methodology for implementing the scree test in PCA, suitable for researchers across various disciplines including pharmaceutical research and biomarker discovery.
Protocol 1: Implementing Cattell's Scree Test for Principal Component Selection
Purpose: To determine the optimal number of principal components to retain using Cattell's scree test methodology.
Materials and Software Requirements:
- Dataset with n observations and p variables
- Statistical software with PCA capability (e.g., R, Python with scikit-learn, Minitab)
- Visualization tools for creating scree plots
Procedure:
Data Preparation:
- Standardize variables if using correlation matrix for PCA (essential when variables have different units or scales) [11].
- Ensure sample size adequacy (generally n > 50 and n > 5×p for stable results).
Initial PCA Execution:
Scree Plot Construction:
Visual Inspection and Elbow Identification:
- Examine the plot for a distinct "elbow" or point of maximum curvature where the slope changes from steep to gradual [15] [9].
- Identify the component number immediately before this elbow point.
- Retain all components to the left of this point (higher eigenvalues) as meaningful [9].
- Discard components to the right of this point (the "scree") as representing error variance [15].
Validation and Interpretation:
- Calculate cumulative variance explained by retained components to ensure sufficient explanatory power (typically 70-90% for most applications) [11].
- Compare with other retention criteria (e.g., Kaiser rule, parallel analysis) for consensus [4] [11].
- Interpret retained components by examining variable loadings (eigenvectors) to assign meaningful conceptual labels [11].
Troubleshooting Notes:
- For ambiguous plots with multiple elbows, consider domain knowledge, theoretical expectations, or more objective methods like parallel analysis [15] [9].
- If the scree plot shows a smooth curve without a clear elbow, this may indicate the absence of strong factor structure in the data.
- When different scaling methods produce different plots, report the method used and consider consistency across methods [9].
Research Reagent Solutions for PCA Implementation
Table 2: Essential Analytical Tools for PCA and Scree Plot Implementation
| Tool/Software | Specific Function | Application Context | Implementation Example |
|---|---|---|---|
| Statistical Software (R) | prcomp(), princomp() functions for PCA; fviz_eig() from factoextra for visualization [4] [18] |
Comprehensive statistical analysis and visualization | fviz_eig(pca_model, addlabels=TRUE, linecolor="Red", ylim=c(0,50)) creates scree plot with variance percentages [4] |
| Python Scikit-learn | PCA() class from sklearn.decomposition [4] |
Machine learning pipelines and data preprocessing | pca.explained_variance_ returns eigenvalues; pca.n_components_ shows selected components [4] |
| Minitab Statistical Software | Eigenanalysis and scree plot generation [11] | Quality control and industrial statistics | Provides eigenvalues, proportions, cumulative variance, and eigenvectors in standardized output [11] |
| Kaiser Criterion | Automated component selection based on eigenvalue >1 rule [11] | Initial screening and comparison with scree test results | Useful when combined with scree plot; sometimes retains slightly different number of components [4] [11] |
Comparative Analysis and Methodological Integration
Comparison of Component Retention Methods
The scree test should not be used in isolation but rather as part of a comprehensive approach to component retention. The following table compares major retention methods, highlighting their relative strengths and limitations.
Table 3: Comparative Analysis of Component/Factor Retention Methods
| Method | Theoretical Basis | Implementation | Advantages | Limitations |
|---|---|---|---|---|
| Scree Test (Cattell, 1966) | Visual identification of break point between major components and error factors [15] [9] | Subjective visual inspection of eigenvalue plot [15] | Intuitively appealing; based on structure of own data; identifies meaningful break points [15] | Subjective; multiple elbows possible; unreliable without clear break; axis scaling affects appearance [9] |
| Kaiser Criterion (Kaiser, 1960) | Retain components with eigenvalues >1 (if using correlation matrix) [11] | Automated threshold application | Objective; easy to implement; widely available in software [11] | Often overfactors or underfactors; particularly problematic with many variables (>50) [4] |
| Variance Explained | Retain components until predetermined variance percentage reached (e.g., 70-90%) [11] | Cumulative proportion calculation | Pragmatic; ensures sufficient information retention; application-specific [11] | Arbitrary threshold; may include trivial components or exclude meaningful ones [4] |
| Parallel Analysis (Horn, 1965) | Compare actual eigenvalues with those from random data [19] | Simulation with random datasets | More objective; controls for sampling error; good accuracy [19] | Computationally intensive; not always available in software; implementation variations exist [19] |
Integration with Broader Research Workflow
The scree test functions within a comprehensive analytical workflow for multivariate data analysis. The following diagram illustrates how Cattell's scree test integrates with other methodological approaches in a typical research pipeline for optimal component selection.
Figure 2: Integration of scree test within comprehensive component selection workflow
Critical Evaluation and Contemporary Applications
Methodological Limitations and Refinements
Despite its enduring popularity, the scree test has faced methodological criticisms that researchers must acknowledge:
Subjectivity Concerns: The identification of the "elbow" point remains inherently subjective, with different analysts potentially identifying different break points on the same plot [9]. This inter-rater variability can affect the reliability of results, particularly in regulatory contexts where methodological consistency is valued.
Multiple Elbow Ambiguity: Some scree plots display multiple points of curvature, creating uncertainty about which elbow represents the true break between meaningful components and scree [15] [9]. This situation often arises in complex datasets with hierarchical factor structures.
Scale Sensitivity: The visual appearance of scree plots can vary depending on the scaling of axes, particularly the y-axis range, potentially influencing elbow identification [9]. This lack of standardization complicates cross-study comparisons.
Retention Conservatism: Evidence suggests the scree test may sometimes retain too few components, potentially excluding meaningful factors that explain substantively important variance [9].
Recent computational advances have addressed these limitations through objective algorithmic approaches. The Kneedle algorithm formalizes elbow detection by identifying the point of maximum curvature mathematically, reducing subjectivity [9]. Similarly, parallel analysis enhances objectivity by comparing actual eigenvalues to those derived from random datasets [19].
Applications in Pharmaceutical and Biomedical Research
The scree test maintains particular relevance in pharmaceutical and biomarker research where dimensionality reduction precedes critical analyses:
Biomarker Discovery: In high-throughput genomic, proteomic, and metabolomic studies, scree tests help identify the minimal number of components that capture majority of variance in biomarker panels, facilitating development of simplified diagnostic models.
Clinical Outcome Assessment: During patient-reported outcome (PRO) measure validation, scree tests determine the dimensionality of underlying constructs, ensuring measurement tools adequately capture relevant health domains without overfactoring.
Drug Response Profiling: In pharmacogenomic studies, scree tests assist in identifying dominant patterns of drug response variability, potentially corresponding to distinct molecular subtypes with therapeutic implications.
Quality by Design (QbD): In pharmaceutical manufacturing, scree tests help identify critical process parameters (CPPs) from multivariate process data by distinguishing influential factors from noise in process analytical technology (PAT) datasets.
The enduring utility of Cattell's scree test across these diverse applications stems from its intuitive visual framework for distinguishing signal from noise—a fundamental challenge in all scientific domains dealing with complex multivariate systems.
The scree plot is a foundational graphical tool used primarily in principal component analysis (PCA) and factor analysis to aid in selecting the optimal number of components or factors to retain. Originally proposed by Raymond Cattell in 1966, the technique visualizes the eigenvalues associated with each component, ordered from largest to smallest, to reveal the underlying variance structure of multivariate data [15]. The name "scree" derives from the characteristic rock debris found at the base of mountains, metaphorically representing the point where eigenvalues transition from the steep "mountain face" of meaningful components to the flat "rubble" of trivial variance [15]. For researchers in drug development and biomedicine, proper interpretation of scree plots enables more scientifically defensible decisions about dimensionality reduction, ensuring that captured components represent genuine biological signals rather than random noise.
In practical applications across omics sciences and pharmaceutical research, the scree plot provides an intuitive visual method for balancing parsimony against information retention. By identifying an inflection point known as the "elbow" or "knee," analysts can determine when additional components contribute diminishing returns to explained variance [7]. This approach is particularly valuable for gene expression analysis, spectroscopic data, and clinical biomarker studies where high-dimensional datasets require simplification without sacrificing critical biological information [20]. The subjective nature of traditional scree plot interpretation has spurred development of more formalized criteria, yet its enduring popularity across scientific disciplines underscores its fundamental utility for exploring multivariate data structure.
Theoretical Foundation and Interpretation Criteria
Conceptual Framework of Variance Decomposition
Principal component analysis operates on the fundamental principle of explaining maximum variance through orthogonal linear transformations of original variables. Each eigenvalue (λi) derived from the covariance or correlation matrix represents the proportion of total variance captured by its corresponding component [21]. Mathematically, if we have a scaled covariance matrix X′X/(NT) with eigenvalues λ1,N ≥ λ2,N ≥ ... ≥ λN,N, the total variance equals the sum of all eigenvalues, standardized to 1 for correlation-based PCA [21]. The scree plot simply visualizes these eigenvalues in descending order of magnitude, creating a characteristic downward curve that reveals the relative importance of successive components.
The theoretical justification for the elbow method rests on distinguishing systematic variation from random noise. Components preceding the elbow theoretically represent structured variance reflecting genuine relationships among variables, while those following the elbow primarily represent random error or noise [13]. In biological datasets, this distinction corresponds to separating technical artifacts and stochastic variation from meaningful biological signals. The scree plot thus serves as a diagnostic for determining the intrinsic dimensionality of a dataset—the number of components needed to capture its essential structure before encountering diminishing returns.
Established Interpretation Methods
Table 1: Criteria for Scree Plot Interpretation in Component Selection
| Method | Key Principle | Implementation | Advantages | Limitations |
|---|---|---|---|---|
| Traditional Elbow | Visual identification of inflection point | Locate point where slope changes from steep to flat | Intuitive; No calculations needed | Subjective; Multiple elbows possible |
| Kaiser-Guttman | Retain components with eigenvalues >1 | Calculate eigenvalues from correlation matrix | Objective; Easy to implement | Often overestimates components in high-dim data |
| Variance Explained | Cumulative proportion of total variance | Retain components until ~80-90% variance explained [22] | Directly addresses information retention | Arbitrary threshold; Sample size dependent |
| Parallel Analysis | Comparison to random data eigenvalues | Simulate data with no factors; retain components exceeding random eigenvalues [13] | Statistical foundation; Reduces overfitting | Computationally intensive; Requires simulations |
The most straightforward approach to scree plot interpretation remains Cattell's original visual method, which seeks the point where the steep decline in eigenvalues transitions to a more gradual slope [7]. This "elbow" represents the optimal trade-off between parsimony and comprehensiveness. For example, in a PCA of the 50-item Big Five Personality Inventory, the scree plot typically shows a distinct elbow after five components, corresponding to the theoretical five-factor structure of personality [15]. Similarly, analysis of Fisher's iris dataset reveals that the first two principal components explain approximately 96% of the total variance, with subsequent components contributing minimally [23].
The Kaiser-Guttman criterion (eigenvalue >1) provides a simple quantitative alternative, particularly when scree plots show ambiguous patterns [7] [22]. However, this method tends to overestimate components in high-dimensional datasets like gene expression arrays, where most variables exhibit minimal correlation [20]. The proportion of variance explained approach sets a predetermined threshold (commonly 80-90%) and selects the minimum number of components needed to reach this threshold [22]. This method directly addresses the information retention goal of dimensionality reduction but relies on an arbitrary cutoff that may not reflect underlying data structure.
Experimental Protocols and Implementation
Standardized Workflow for Scree Plot Analysis
Diagram 1: Standardized workflow for scree plot analysis from data preparation through final component selection decision.
Detailed Protocol for PCA and Scree Plot Generation
Protocol 1: Principal Component Analysis with Scree Plot Visualization
This protocol outlines the complete procedure for performing PCA and generating scree plots for component selection, with specific examples from gene expression analysis and pharmaceutical applications.
Data Preparation and Preprocessing
- Standardize variables if using a correlation matrix (recommended when variables have different units of measurement) [23]
- Center variables by subtracting means (automatically performed by most PCA algorithms)
- Address missing data through imputation or casewise deletion
- For gene expression data: apply appropriate normalization (e.g., quantile normalization) before PCA [20]
Matrix Decomposition and Eigenvalue Calculation
- Compute the covariance matrix X′X/(N-1) for centered data or correlation matrix for standardized data
- Perform eigenvalue decomposition: X′X/(N-1) = VΛV′ where Λ = diag(λ1, λ2, ..., λ_p) contains eigenvalues
- Sort eigenvalues in descending order: λ1 ≥ λ2 ≥ ... ≥ λ_p
- Calculate proportion of variance explained: Variancei = λi/∑{j=1}^p λj
- Compute cumulative variance explained: Cumulativei = ∑{j=1}^i λj/∑{j=1}^p λ_j
Scree Plot Generation and Visualization
- Create a line plot with component numbers on x-axis and corresponding eigenvalues on y-axis
- Use adequate labeling: "Principal Component" on x-axis, "Eigenvalue" or "Variance Explained" on y-axis [22]
- Add reference lines: horizontal line at eigenvalue=1 (Kaiser criterion) and vertical lines at potential elbows
- For enhanced interpretation, create dual-panel plots showing both individual and cumulative variance [22]
Implementation in Statistical Software
- R: Use
prcomp()orprincomp()functions, withscreeplot()for visualization [13] - Python: Utilize
sklearn.decomposition.PCA()with manual plotting ofexplained_variance_attribute [22] - SAS: Implement
PROC PRINCOMPwithplots=screeoption [23] - Specialized packages:
bio3dfor biological data,veganfor ecological applications [24]
- R: Use
Research Reagents and Computational Tools
Table 2: Essential Research Reagent Solutions for Scree Plot Analysis
| Tool/Category | Specific Examples | Function/Purpose | Implementation Considerations |
|---|---|---|---|
| Statistical Environments | R, Python with scikit-learn, SAS PROC PRINCOMP | Provides PCA algorithms and eigenvalue calculation | R offers extensive visualization; Python integrates with machine learning workflows |
| Visualization Packages | ggplot2 (R), matplotlib (Python), SAS ODS Graphics | Creates publication-quality scree plots | Customize colors, labels, and reference lines for clear interpretation |
| Specialized PCA Modules | bio3d (R), scikit-bio (Python), MULTBIPLOT (SAS) | Implements domain-specific variations and enhancements | Bio3d particularly suited for molecular and structural biology data |
| Data Preprocessing Tools | PreProcessCore (R), sklearn.preprocessing (Python) | Handles normalization, scaling, and missing data | Critical for omics data where normalization significantly impacts results |
| Benchmarking Methods | Parallel analysis, permutation tests, factor congruence | Provides objective validation of visual elbow selection | Parallel analysis compares eigenvalues to random data expectation [13] |
Advanced Applications and Methodological Extensions
Extended Application Across Methodological Domains
The elbow method and scree plot interpretation have expanded beyond traditional factor analysis to diverse applications in computational biology and pharmaceutical research. In nonnegative matrix factorization (NMF) for gene expression analysis, the Unit Invariant Knee (UIK) method adapts the elbow approach to determine optimal factorization rank by identifying inflection points in the residual sum of squares [20]. This application demonstrates how the fundamental elbow concept transfers to related dimensionality reduction techniques, providing objective criteria for rank selection in matrix factorization problems.
In factor mixture modeling (FMM), researchers face the challenge of class enumeration—determining the correct number of latent classes in heterogeneous populations. The elbow plot method has been adapted for this context by plotting information criterion values (AIC, BIC) against the number of classes rather than eigenvalues against components [25]. Simulation studies demonstrate that this approach correctly identifies the generating model 90% of the time for two- and three-class FMMs, performing particularly well compared to alternative criteria in biologically plausible scenarios [25].
Formal Mathematical Frameworks for Elbow Detection
Diagram 2: Formal elbow detection methodologies extending beyond visual interpretation, showing relationships between mathematical approaches and their primary application domains.
Recent methodological developments have formalized the intuitive elbow concept through mathematical frameworks. One approach compares surfaces under the scree plot, operationalizing Cattell's "steep" versus "not steep" distinction by analyzing differences in consecutive eigenvalue products [21]. Formally, this method examines the sequence DJN(k) = (k+1)λ{k+1,N} - kλ{k,N}, where λ{k,N} represents the k-th largest eigenvalue, identifying the elbow where this difference stabilizes [21]. This quantitative approach reduces subjectivity while maintaining the scree test's conceptual foundation.
The Unit Invariant Knee (UIK) method represents another formalization, specifically designed for rank selection in NMF of gene expression data [20]. Rather than relying on visual inspection, UIK algorithmically identifies the first inflection point in the curvature of the residual sum of squares, corresponding to the point of maximum deceleration in variance explanation. This approach offers computational efficiency and objectivity while avoiding arbitrary threshold parameters that plague alternative metrics like the cophenetic correlation coefficient [20].
Comparative Analysis and Validation Framework
Empirical Performance Across Methodological Contexts
Table 3: Performance Comparison of Elbow Detection Methods Across Applications
| Application Context | Optimal Method | Performance Metrics | Key Considerations | Reference Examples |
|---|---|---|---|---|
| Gene Expression NMF | Unit Invariant Knee (UIK) | Computational efficiency; Agreement with known dimensions | Superior to cophenetic metric; Free from prior rank input | Acute lymphoblastic leukemia data [20] |
| Factor Mixture Models | Elbow plot of BIC values | 90% accuracy for 2-3 class models | Outperforms lowest value criterion for simple structures | Personality assessment data [25] |
| Traditional PCA | Parallel analysis with scree plot | Minimizes overfactoring; Statistical justification | More robust than Kaiser criterion alone | Big Five Inventory [15] |
| Clinical Biomarker PCA | Variance explained (80-90%) with scree validation | Biological interpretability; Clinical relevance | Balances statistical and practical considerations | Iris dataset [23] [22] |
Empirical evaluations across diverse methodological contexts reveal that elbow-based methods demonstrate strong performance when appropriately matched to analytical goals. In factor mixture models for psychological assessment, the elbow plot method correctly identified generating models with 90% accuracy for two- and three-class conditions, outperforming the lowest value criterion and difference methods in these biologically plausible scenarios [25]. However, performance diminished for complex four-class conditions with two factors, highlighting the importance of context-specific method selection.
For gene expression analysis utilizing nonnegative matrix factorization, the Unit Invariant Knee method demonstrated significant computational advantages over consensus matrix-based approaches while maintaining accuracy against simulated data with known dimensions [20]. This combination of efficiency and objectivity makes formalized elbow methods particularly valuable for high-dimensional biological data where visual inspection becomes impractical and computational efficiency is paramount.
Validation Protocols and Goodness-of-Fit Assessment
Bootstrap Validation for Elbow Stability
- Generate multiple bootstrap samples from original dataset
- Perform PCA on each resample and construct corresponding scree plots
- Calculate consistency of elbow location across resamples
- High variation in elbow position suggests unreliable component selection
Parallel Analysis Implementation
- Simulate uncorrelated random datasets matching original data dimensions
- Perform PCA on simulated data and compute average eigenvalues
- Plot simulated eigenvalues alongside observed eigenvalues
- Retain components where observed eigenvalues exceed simulated eigenvalues [13]
Goodness-of-Fit and Interpretability Checks
- Examine residuals after extracting selected components
- Assess biological plausibility of component loadings
- For gene expression: check enrichment of component-associated genes in functional pathways
- For clinical data: validate component associations with external clinical variables
The integration of multiple validation approaches strengthens component selection decisions, particularly when different criteria suggest conflicting solutions. Residual analysis provides diagnostic information about model adequacy, with standardized residuals greater than 2 indicating potential misfit [13]. Parallel analysis offers statistical justification by comparing observed eigenvalues to those expected from random data, reducing capitalization on chance patterns [13]. Most critically in pharmaceutical and biological applications, component solutions must demonstrate interpretability within established biological frameworks, ensuring that statistical dimensions correspond to meaningful biological constructs.
Scree plot analysis remains an essential tool for determining intrinsic data dimensionality across biological and pharmaceutical research contexts. The visual elbow method provides an accessible starting point, while formal extensions like the Unit Invariant Knee method offer objective, computationally efficient alternatives for high-throughput applications. Successful implementation requires matching method selection to analytical goals—favoring variance-explained thresholds for clinically oriented studies, parallel analysis for exploratory psychometrics, and algorithmic approaches for genomic applications requiring objectivity and efficiency.
For researchers implementing these techniques, a sequential approach combining multiple criteria typically yields the most defensible results. Begin with visual scree plot examination to identify candidate solutions, then apply appropriate quantitative criteria (variance explained, parallel analysis, or UIK) for validation. Finally, assess the biological interpretability and stability of proposed solutions through resampling and external validation. This comprehensive approach leverages both the intuitive appeal of traditional scree plots and the statistical rigor of contemporary extensions, ensuring component selection decisions that are both mathematically sound and scientifically meaningful within drug development and biomedical research contexts.
Within the framework of research on selecting the optimal number of principal components (PCs), the scree plot stands as a foundational graphical tool introduced by Raymond Cattell in 1966 [15] [9]. Its primary function is to aid in determining the dimensionality of a dataset in analyses like Principal Component Analysis (PCA) and Exploratory Factor Analysis (EFA). This protocol directly compares the scree plot method against a prevalent variance-based method—the cumulative variance threshold—evaluating their theoretical bases, applications, and performance in practical research scenarios, particularly for scientific and drug development professionals.
The core challenge in PCA is to balance parsimony and information retention. While simple variance thresholds offer an objective criterion, the scree plot provides a visual assessment of the underlying data structure, making the choice between them context-dependent [11] [26].
Theoretical Foundations
The Scree Plot Method
A scree plot is a line graph that displays the eigenvalues of principal components in descending order of magnitude [27]. The name "scree," derived from geology, refers to the loose rock debris that accumulates at the base of a mountain, metaphorically representing the point where eigenvalues level off and form a straight line of "rubbish" components [15]. The key to interpretation lies in identifying the "elbow" or inflection point—the location where the steep decline in eigenvalues transitions to a gradual flattening [7] [9]. Components to the left of this elbow are considered meaningful and are retained for further analysis.
The Cumulative Variance Threshold Method
This method involves selecting the smallest number of principal components such that their cumulative explained variance meets or exceeds a pre-defined threshold [11] [28]. Common thresholds in practice are 80%, 90%, or 95% of the total variance [26]. The proportion of variance explained by each component is calculated as its eigenvalue divided by the sum of all eigenvalues [27]. This approach provides an objective and easily automatable criterion for component selection.
Comparative Theoretical Basis
| Feature | Scree Plot Method | Cumulative Variance Method |
|---|---|---|
| Underlying Principle | Visual identification of the point where eigenvalues from meaningful components transition to "rubbish" components [15] | Achieving a pre-specified level of information retention (variance explained) [11] |
| Primary Output | A suggested number of components, ( k ), based on the elbow [7] | A suggested number ofcomponents, ( k ), based on a variance threshold [28] |
| Key Strength | Reflects the inherent structure and dimensionality of the data [27] | Simple, objective, and ensures a measurable level of information preservation [11] |
| Key Weakness | Subjective interpretation can lead to ambiguity, especially with multiple elbows [9] | Does not directly assess the true dimensionality and may retain noise to meet the threshold [26] |
Experimental Protocols
Protocol A: Generating and Interpreting a Scree Plot
This protocol details the steps for creating a scree plot from a multivariate dataset, such as gene expression data or protein structural variables [27] [26].
Procedure:
- Data Standardization: Standardize the data matrix ( X ) (with ( p ) variables and ( n ) observations) to have a mean of zero and unit variance for each variable. This is crucial when variables are on different scales [29].
- Compute Covariance/Correlation Matrix: Calculate the ( p \times p ) covariance matrix (if variables are on comparable scales) or correlation matrix (for standardized data) [27] [26].
- Eigenvalue Decomposition: Perform eigenvalue decomposition on the matrix to extract eigenvalues ( \lambda1 \geq \lambda2 \geq \dots \geq \lambda_p \geq 0 ) and corresponding eigenvectors [27].
- Plot Eigenvalues: Create a line plot with the component index (1 to ( p )) on the x-axis and the corresponding eigenvalue on the y-axis [7].
- Identify the Elbow: Visually inspect the plot for the point of maximum curvature where the steep slope transitions to a flatter line. The components before this elbow are retained [9].
Protocol B: Applying a Cumulative Variance Threshold
This protocol provides an objective, non-visual method for selecting the number of components [11] [28].
Procedure:
- Execute Steps 1-3 of Protocol A: Standardize the data and compute eigenvalues.
- Calculate Variance Proportions: For each component ( i ), compute the proportion of variance explained: ( \frac{\lambdai}{\sum{j=1}^{p} \lambda_j} ) [27].
- Calculate Cumulative Variance: For the ( k )-th component, compute the cumulative variance: ( \frac{\sum{i=1}^{k} \lambdai}{\sum{j=1}^{p} \lambdaj} ) [11].
- Apply Threshold: Determine the smallest integer ( k ) for which the cumulative variance meets or exceeds the chosen threshold (e.g., 80%, 90%, 95%) [26] [28].
Data Presentation and Comparison
Quantitative Comparison of Methods
The following table synthesizes key performance metrics for the two methods based on a review of the literature and practical applications [7] [11] [26].
Table 1: Comparative Analysis of Component Selection Methods
| Criterion | Scree Plot | Cumulative Variance Threshold |
|---|---|---|
| Objectivity | Low (subjective visual interpretation) [9] | High (precise numerical criterion) [11] |
| Ease of Automation | Low | High [28] |
| Handling of Ambiguous Cases | Poor (multiple elbows complicate decisions) [9] | Good (provides a unambiguous answer) |
| Information Preservation Guarantee | None directly | Explicit (e.g., ensures 90% variance kept) [11] |
| Sensitivity to Data Dimensionality | High (plot shape changes with ( p )) [27] | Low (robust across different ( p )) |
| Commonly Cited Performance | Often agrees with Kaiser criterion (eigenvalue >1) in clear cases [7] | Effective for descriptive purposes at ~80%; requires ≥90% for subsequent analyses [11] |
Empirical Example from a Protein Dynamics Study
In a PCA of a protein trajectory using alpha carbon atoms, the scree plot showed a distinct kink (elbow) after the first 20 modes. These 20 modes defined the "essential space," capturing the large-scale motions governing biological function. A cumulative variance threshold of 80% might have retained fewer components, potentially omitting biologically relevant but lower-variance motions, while a 95% threshold might have retained over 100 components, many representing small-scale noise [26]. This demonstrates the scree plot's utility in identifying a parsimonious and biologically meaningful subspace.
The Scientist's Toolkit: Research Reagent Solutions
Table 2: Essential Computational Tools for PCA and Scree Plot Analysis
| Tool / Resource | Function / Description | Example Use Case |
|---|---|---|
| Statistical Software (R/Python) | Provides the computational environment for performing PCA, eigenvalue decomposition, and visualization [27] [29]. | R's prcomp() or princomp() functions; Python's sklearn.decomposition.PCA. |
| Standardization Algorithm | Pre-processing step to center and scale variables to mean=0 and variance=1 [29]. | Essential when variables are on different scales (e.g., gene expression levels vs. clinical measurements). |
| Eigenvalue Decomposition Solver | The numerical linear algebra core that computes eigenvalues and eigenvectors from a covariance/correlation matrix [27]. | Automated within PCA functions of standard statistical packages. |
| Visualization Package | Generates the scree plot and other diagnostic graphs (e.g., cumulative variance plot) [28]. | R's ggplot2 for custom plots; Python's matplotlib. |
| Parallel Analysis Script | A more objective alternative/complement to the scree test that compares data eigenvalues to those from random data [6]. | Used to validate the number of components suggested by the scree plot, reducing subjectivity. |
Integrated Workflow for Component Selection
The following diagram synthesizes the protocols into a recommended decision framework for researchers.
The choice between a scree plot and a simple variance threshold is not mutually exclusive. A robust analysis should employ both methods as complementary diagnostic tools [11] [28] [6].
- Use a Scree Plot When: The primary goal is to discover the inherent dimensionality of the data, especially during the exploratory phase of research. It is particularly valuable in fields like bioinformatics and protein dynamics where the goal is to identify a small set of "essential" components that capture major structural or functional shifts, even if they don't explain an arbitrarily high percentage of variance [26].
- Use a Variance Threshold When: The analysis requires an objective, reproducible criterion for component selection. It is ideal for automated pipelines, when a specific amount of information retention is required for downstream analysis, or for descriptive purposes where explaining a fixed amount of variance (e.g., 80-90%) is sufficient [11].
For research demanding high confidence, the scree plot should be the starting point for hypothesis generation about data dimensionality, with its suggestion validated against a variance threshold and other objective methods like parallel analysis [6]. This integrated approach ensures that model parsimony is achieved without sacrificing critical, domain-relevant information.
From Theory to Practice: A Hands-On Guide to Generating and Interpreting Scree Plots in R and Python
This application note provides a detailed protocol for the critical data preprocessing step of standardization and centering prior to Principal Component Analysis (PCA) in clinical research. Proper preprocessing is fundamental for generating reliable scree plots and accurately determining the optimal number of principal components, which directly impacts the validity of downstream analyses in drug development and biomarker discovery. We present experimental validation demonstrating that inappropriate preprocessing can lead to misinterpretation of data structure, ultimately compromising research conclusions. The guidelines herein are designed to ensure that PCA outcomes are both biologically meaningful and statistically robust.
Principal Component Analysis (PCA) is a powerful dimensionality reduction technique widely used to analyze high-dimensional clinical datasets, such as genomic profiles, patient health records, and medical imaging data [8] [30]. By transforming original variables into a new set of uncorrelated variables (principal components), PCA helps identify key patterns, trends, and sources of variation within complex biological systems [31].
The process of PCA is highly sensitive to the variances of the initial variables [8]. Clinical data often contain variables measured on different scales (e.g., blood glucose levels in mmol/L, gene expression counts, and age in years). If variables with larger numerical ranges are not standardized, they will dominate the PCA procedure, potentially obscuring biologically relevant patterns from variables with smaller ranges [8] [32]. Standardization and centering correct for this by ensuring all variables contribute equally to the analysis. This preprocessing step is not merely a technical formality but a crucial determinant for the accurate interpretation of scree plots and the correct selection of principal components that capture genuine biological signal rather than measurement artifacts [30].
The Critical Role of Preprocessing in PCA
The Problem of Differing Scales in Clinical Data
In clinical and biomarker research, datasets are inherently heterogeneous. Consider a simple dataset containing:
- Binary or Categorical Variables: Presence or absence of a genetic mutation (0 or 1), patient sex (0/1).
- Ordinal Variables: Disease severity scores ranging from 0 to 5.
- Continuous Variables with Large Ranges: Serum cholesterol levels (e.g., 150-300 mg/dL), gene expression values spanning several orders of magnitude.
Without preprocessing, a variable like serum cholesterol will exert a disproportionately large influence on the principal components compared to a binary variable, simply due to its numerical range [32]. The PCA algorithm, which operates by maximizing variance in the derived components, will be biased towards variables with larger scales, as they contribute more to the total variance calculated in the sum of squares [32]. This can lead to a misleading representation where the first few principal components primarily reflect scale differences rather than underlying biological relationships.
The Mathematical Foundation: Covariance vs. Correlation Matrix
The need for standardization is rooted in the mathematics of PCA, which is typically solved via the Singular Value Decomposition (SVD) of the data matrix [32].
- Without Standardization (Covariance Matrix PCA): PCA is performed on the covariance matrix of the original data. The covariance between two variables is scale-dependent, meaning that the resulting principal components will be dominated by the variables with the largest variances.
- With Standardization (Correlation Matrix PCA): Standardizing data (centering and scaling to unit variance) before applying PCA is equivalent to performing PCA on the correlation matrix [8]. This ensures that all variables are treated as equally important, each contributing one unit of variance to the total variance.
Geometrically, centering the data (subtracting the mean) ensures the point swarm is repositioned around the origin of the coordinate system, which is a prerequisite for the "lines and planes of closest fit" that PCA seeks [31]. Scaling then equalizes the "length" of each coordinate axis, creating a uniform spherical space where directions of maximum variance can be identified without bias [31].
Experimental Protocols
Protocol: Data Standardization and Centering for PCA
This protocol details the two-step process for standardizing a clinical data matrix ( X ) with ( N ) rows (observations, e.g., patients) and ( P ) columns (variables, e.g., biomarkers).
Step 1: Centering
The goal of centering is to reposition the data so that its mean is at the origin.
- Calculation: For each variable ( j ) in the data matrix, compute its mean, ( \bar{x}_j ).
- Transformation: Subtract the mean of the variable from each individual value.
- Outcome: The mean of every variable in the centered dataset is zero.
Step 2: Scaling (Standardization to Unit Variance)
The goal of scaling is to adjust the variables so they all have a uniform scale and contribute equally to the analysis.
- Calculation: For each centered variable ( j ), compute its standard deviation, ( s_j ).
- Transformation: Divide each centered value by the standard deviation of its variable.
- ( x{\text{standardized},ij} = \frac{x{\text{centered},ij}}{sj} = \frac{x{ij} - \bar{x}j}{sj} ) [8]
- Outcome: Every standardized variable has a mean of zero and a standard deviation (and variance) of one.
Workflow Visualization
The following diagram illustrates the complete standardization workflow and its role in the broader PCA process for clinical data.
Experimental Validation: Impact of Preprocessing on Simulated Clinical Data
To empirically demonstrate the necessity of standardization, we followed an experimental procedure adapted from a published simulation study [32].
Objective: To visualize how preprocessing choices can create artificial clusters or mask true data structure in a PCA output and subsequent scree plot.
Methodology:
- Data Generation: A dataset was simulated with 200 observations (
N = 200) and 5 continuous variables drawn from a standard normal distribution. A sixth variable was added to represent a dominant clinical variable (e.g., a highly abundant protein or a binary resource index), which took values of 0 or 5 assigned randomly [32]. - Preprocessing & Analysis: The dataset was analyzed under three conditions:
- A. No Preprocessing: PCA was applied directly to the raw data.
- B. Normalization (L2 Norm): Data was normalized using the L2 norm (scaling the magnitude of each observation's vector to 1).
- C. Standardization (Centering & Unit Variance Scaling): Data was processed as per the protocol in Section 3.1.
- Visualization: For each condition, a two-component PCA was performed, and the results were visualized in a score plot. The corresponding scree plots were also generated.
Results:
- Condition A (No Preprocessing): The score plot showed two distinct clusters, entirely driven by the dominant sixth variable. The scree plot suggested a strong, potentially misleading, underlying data structure.
- Condition B (Normalization): The clustering effect persisted, though the plot's appearance changed.
- Condition C (Standardization): The score plot correctly showed a random scatter of points with no apparent clusters, and the scree plot reflected the true, random nature of the data, accurately indicating a lack of strong latent structure [32].
Conclusion: This experiment confirms that standardization is essential to prevent variables with larger scales from dominating the PCA and leading to false conclusions about clustering or data patterns in clinical research.
The Researcher's Toolkit: Reagents and Computational Solutions
Table 1: Essential Tools for Implementing PCA Preprocessing and Analysis.
| Item | Function in PCA Preprocessing | Example Solutions / Notes |
|---|---|---|
| Statistical Software | Provides functions for data centering, scaling, and PCA computation. | R (prcomp(), scale()), Python/Sci-Kit Learn (StandardScaler(), PCA()) [33] [6] |
| Data Visualization Library | Generates scree plots and PCA score plots for component selection and interpretation. | R (ggplot2), Python (Matplotlib, Seaborn) |
| Ledoit-Wolf Covariance Estimator | An alternative covariance estimation technique that can improve stability in high-dimensional settings where ( n << p ) [30]. | Available in packages like scikit-cov in Python. |
| Unit Variance Scaling | The specific scaling method that sets each variable's variance to 1, ensuring equal contribution [31]. | This is the default scaling in most software PCA functions when using the correlation matrix. |
Connecting Preprocessing to Scree Plots and Component Selection
The scree plot, which graphs eigenvalues against principal component numbers, is a primary tool for determining the optimal number of components to retain [13]. The choice of preprocessing directly impacts this plot's shape and interpretation.
- Effect of Improper Preprocessing: Without standardization, the first eigenvalue(s) will be artificially large, representing the disproportionate variance from high-scale variables. The "elbow" in the scree plot—the point where the curve flattens, indicating components beyond which little variance is gained—may appear later or earlier than it should, leading to the retention of too many or too few components [30]. This can result in overfitting or loss of critical biological information.
- Ensuring a Valid Scree Plot: Standardization creates a level playing field. The resulting eigenvalues reflect the true correlational structure of the data, not its scale artifacts. This allows the scree plot to more accurately reveal the genuine dimensionality of the data. In healthcare research, this means that components retained based on the scree plot are more likely to represent real clinical phenomena, such as distinct disease subtypes or biomarker signatures [34].
Standardization and centering are non-negotiable preprocessing steps for PCA applied to clinical data. They are not merely mathematical formalities but critical procedures that ensure the validity of the entire analytical workflow, from an accurate scree plot to the correct identification of biologically and clinically relevant principal components. By adhering to the detailed protocol and principles outlined in this application note, researchers in drug development and clinical science can enhance the reliability of their findings, ensuring that their models are built upon genuine biological signals rather than measurement artifacts.
Principal Component Analysis (PCA) is a fundamental dimensionality reduction technique that simplifies complex, high-dimensional datasets by transforming them into a new set of uncorrelated variables called principal components (PCs). These components are linear combinations of the original variables, constructed such that the first PC captures the maximum possible variance in the data, with each succeeding component capturing the next highest variance under the constraint of orthogonality to preceding components [8]. The eigenvalues derived from the covariance matrix quantitively represent the amount of variance captured by each corresponding eigenvector (principal component) [35]. The scree plot, a graphical representation of these eigenvalues in descending order of magnitude, serves as a critical diagnostic tool for identifying the optimal number of principal components to retain, effectively balancing data simplification with information preservation [36] [4] [37].
Experimental Protocol: PCA Execution and Eigenvalue Extraction
Materials and Software Requirements
Table 1: Essential Research Reagent Solutions for PCA Implementation
| Item Name | Specification / Function | Example Implementation |
|---|---|---|
| Computational Environment | Software for statistical computing and matrix operations. | Python (with scikit-learn, NumPy, pandas) or R (with stats, factoextra packages) [38]. |
| Standardized Dataset | A numeric data matrix where variables are continuous and measured on comparable scales. | An ( N \times P ) matrix, where ( N ) is the number of observations and ( P ) is the number of variables [12]. |
| Covariance Matrix Calculator | Algorithm to compute the covariance matrix, quantifying how variables vary from the mean with respect to each other [8]. | numpy.cov() in Python or cov() in R [35]. |
| Eigendecomposition Solver | Function to calculate eigenvectors and eigenvalues of the covariance matrix. | np.linalg.eig() in Python or eigen() in R [35]. |
| Plotting Library | Tool to visualize the eigenvalues and create the scree plot. | matplotlib.pyplot in Python or fviz_eig() in the factoextra R package [4]. |
Step-by-Step Workflow
The following diagram illustrates the end-to-end workflow for executing PCA and generating the scree plot.
Data Preprocessing and Standardization
Prior to PCA, continuous data must be standardized. This critical step centers the data by subtracting the mean of each variable and scales it by dividing by the standard deviation [8] [38]. The formula for standardization is:
[ X_{\text{standardized}} = \frac{X - \mu}{\sigma} ]
where ( X ) is the original value, ( \mu ) is the feature mean, and ( \sigma ) is its standard deviation [35]. Standardization ensures that each variable contributes equally to the analysis, preventing features with inherently larger scales from dominating the variance calculations and biasing the results [8] [35]. Most standard PCA implementations perform centering by default, but scaling is especially crucial for datasets with heterogeneous features [38].
Covariance Matrix Computation
Compute the covariance matrix of the standardized data. The covariance matrix is a symmetric ( p \times p ) matrix (where ( p ) is the number of dimensions) whose entries represent the covariances between all possible pairs of the initial variables [8]. The diagonal elements represent the variances of individual variables. This matrix reveals the relationships between variables: a positive covariance indicates that two variables increase or decrease together, while a negative covariance indicates they move in opposite directions [8] [35].
Eigendecomposition
Perform eigendecomposition on the computed covariance matrix. This process yields two key elements [8] [35]:
- Eigenvectors: These define the directions of the new feature space, representing the principal components themselves. The first eigenvector points in the direction of the maximum variance in the data.
- Eigenvalues: These are scalar coefficients attached to the eigenvectors, quantifying the amount of variance carried by each corresponding principal component.
Eigenvalue Extraction and Sorting
Extract the eigenvalues and sort them in descending order. The rank of the eigenvalues signifies the importance of their corresponding principal components [8]. The largest eigenvalue corresponds to the first principal component, which captures the most variance, the second largest to the second component, and so on. This ordered set of eigenvalues forms the basis for the scree plot.
Data Interpretation and Analysis
Constructing and Interpreting the Scree Plot
The scree plot is a line plot of the ordered eigenvalues, with the principal component number on the x-axis and the corresponding eigenvalue on the y-axis [36] [4]. The following diagram outlines the primary methods for interpreting this plot to determine the optimal number of components, ( k ).
Interpretation Guidelines:
- The Elbow Method: Visually identify the point where the slope of the line changes sharply from "steep" to "flat," resembling an elbow. The components before this point are typically retained. While intuitive, this method can be subjective [4] [37].
- Kaiser's Rule: A more objective method that retains all components with eigenvalues greater than 1. This rule is based on the logic that a component should explain at least as much variance as one of the original standardized variables [4] [37]. Jolliffe (1972) suggested a more liberal threshold of 0.7 for certain contexts [37].
- Cumulative Variance Explained: Specify a desired threshold for the total variance to be preserved (e.g., 85% or 95%). Then, select the smallest number of components, ( k ), such that the cumulative sum of their explained variance meets or exceeds this threshold [4].
Comparative Analysis of Component Selection Methods
Table 2: Quantitative Comparison of Component Selection Criteria Using a 7-Variable Example Dataset
| Principal Component | Eigenvalue | Individual Variance Explained (%) | Cumulative Variance Explained (%) | Kaiser's Rule ( >1 ) | Broken-Stick Proportion | Judgment |
|---|---|---|---|---|---|---|
| PC1 | 4.21 | 60.1 | 60.1 | Retain | 0.37 | Retain |
| PC2 | 1.15 | 16.4 | 76.5 | Retain | 0.22 | Retain |
| PC3 | 0.83 | 11.9 | 88.4 | Discard | 0.16 | Borderline |
| PC4 | 0.48 | 6.9 | 95.3 | Discard | 0.12 | Discard |
| PC5 | 0.21 | 3.0 | 98.3 | Discard | 0.09 | Discard |
| PC6 | 0.09 | 1.3 | 99.6 | Discard | 0.07 | Discard |
| PC7 | 0.03 | 0.4 | 100.0 | Discard | 0.05 | Discard |
Table 2 illustrates how different rules can suggest different values for ( k ). The Kaiser rule suggests 2 components, the broken-stick model suggests 1, while a cumulative variance threshold of 85% would require 3 components [37]. This underscores that these guidelines are heuristics, and the final choice may depend on the specific analytical goal.
Best Practices and Troubleshooting
- Preprocessing is Critical: Ensure data is correctly standardized. For non-normal data or specific data types (e.g., count data from genomics), consider alternative transformations like log-transforms or Variance Stabilizing Transformations (VST) before standardization [38].
- No Single Best Rule: No single method for choosing ( k ) is universally best. It is recommended to use a combination of the scree plot, Kaiser's rule, and the cumulative variance plot to make an informed decision [4] [37].
- Iterative Process: Applying PCA is often iterative. Start by running PCA without reducing dimensions (
n_components=Nonein scikit-learn) to examine the full spectrum of eigenvalues. Then, re-run PCA with the selectedn_componentsto obtain the final reduced dataset [4]. - Domain Knowledge Integration: Heuristic rules cannot replace domain-specific knowledge. The chosen components should make sense within the context of the research question and allow for a meaningful interpretation of the data's underlying structure [37].
Within the framework of research aimed at determining the optimal number of principal components (PCs) for multivariate data analysis, the scree plot serves as a fundamental graphical tool. It assists researchers in visualizing the proportion of total variance explained by each successive principal component, thereby providing a data-informed method for dimensionality reduction [13]. This protocol details the generation and interpretation of scree plots using both R and Python, enabling integration into automated analysis pipelines for high-throughput data common in drug development and other scientific fields.
Experimental Workflow and Logical Relationships
The procedure for generating and utilizing a scree plot involves a sequence of critical steps, from data preparation to the final decision on the number of components to retain. The following diagram outlines this workflow:
Research Reagent Solutions: Essential Computational Tools
The following table catalogues the key software libraries and their functions required to execute the scree plot protocols described herein.
Table 1: Essential Research Reagents and Computational Tools for Scree Plot Analysis
| Tool/Library | Function in Analysis | Protocol Implementation |
|---|---|---|
| FactoMineR (R) | Performs the Principal Component Analysis, computing eigenvalues and variances [39]. | R Protocol |
| factoextra (R) | Dedicated to the visualization of multivariate data results; used to extract and plot variance metrics [39]. | R Protocol |
scikit-learn (sklearn) (Python) |
Provides data preprocessing and decomposition modules (PCA) for efficient model fitting [40] [41]. |
Python Protocol |
| Matplotlib (Python) | A foundational plotting library used to create custom static visualizations, including the scree plot [40] [41]. | Python Protocol |
Quantitative Data Presentation
The core quantitative output from PCA, which fuels the scree plot, is the explained variance ratio for each component. The following table summarizes this data for a hypothetical dataset, illustrating the typical cumulative gain in explained variance.
Table 2: Example PCA Output: Explained Variance Ratios for Six Components
| Principal Component | Individual Variance Explained (%) | Cumulative Variance Explained (%) |
|---|---|---|
| PC1 | 41.5 | 41.5 |
| PC2 | 23.1 | 64.6 |
| PC3 | 15.4 | 80.0 |
| PC4 | 9.2 | 89.2 |
| PC5 | 6.9 | 96.1 |
| PC6 | 3.9 | 100.0 |
Detailed Experimental Protocols
Protocol for R (usingfactoextraandFactoMineR)
Step 1: Install and Load Required Packages Execute the following code in your R environment to ensure all necessary packages are installed and loaded.
Step 2: Perform Principal Component Analysis
Conduct the PCA on a scaled, numeric data matrix using the PCA() function. The graph = FALSE parameter suppresses automatic plotting [39].
Step 3: Generate the Scree Plot
Use the fviz_eig() function from factoextra to create the scree plot directly from the PCA results object [39].
Protocol for Python (usingsklearnandmatplotlib)
Step 1: Import Required Libraries Begin by importing the necessary Python modules.
Step 2: Preprocess Data and Perform PCA
Standardize the data and fit the PCA model. The n_components parameter can be set to the number of features to compute all possible components [40] [41].
Step 3: Generate the Scree Plot
Extract the explained variance ratios and create a customized scree plot using matplotlib [40] [41].
Interpretation Guidelines and Decision Logic
Interpreting the scree plot requires identifying the point where the curve of individual variances sharply levels off. The following decision diagram guides this process:
The "elbow" or "knee" of the plot represents the point of diminishing returns, where subsequent components contribute little explanatory power [13] [41]. In the example data from Table 2, the elbow is visually identifiable at PC3, which also aligns with the common heuristic of retaining components that collectively explain >70-80% of the total variance [41].
In Principal Component Analysis (PCA), the scree plot is a fundamental graphical tool used to inform the decision of how many principal components to retain. The plot displays the eigenvalues—which represent the amount of variance explained—associated with each principal component in descending order of magnitude. The "elbow point," often described as a bend or break in the slope of the plot, is a key concept for identifying the optimal number of components. This point conceptually separates the components that capture meaningful, structured variance in the data from those that represent minor variance, often attributable to noise. The technique was originally proposed by Raymond Cattell in 1966, who likened the pattern of eigenvalues to a mountainside, where the steep curve represents the meaningful components and the flatter, straight portion at the base represents the "scree," or the debris of trivial, error-laden factors [15]. For researchers in drug development, accurately identifying this point is crucial for effective data reduction, ensuring that significant biological signals are retained for downstream analyses like biomarker identification or patient stratification, while discarding non-informative noise.
Quantitative and Visual Criteria for Elbow Point Identification
Interpreting a scree plot involves a combination of visual inspection and quantitative assessment. The primary goal is to locate the point where the steep decline in eigenvalues levels off, forming a distinct elbow. The components before this elbow are considered significant for retention.
Quantitative Benchmarks
The table below summarizes the key quantitative metrics available in standard PCA outputs that aid in interpreting the scree plot and locating the elbow point.
Table 1: Key Quantitative Metrics for Scree Plot Interpretation
| Metric | Description | Interpretation in Elbow Identification |
|---|---|---|
| Eigenvalue | The variance accounted for by each principal component [8] [11]. | The elbow typically occurs where eigenvalues transition from values >1 to values <1 (Kaiser's rule) and where the absolute size drops precipitously [4] [11]. |
| Proportion of Variance | The percentage of total dataset variance explained by an individual component [11] [42]. | The components before the elbow show a high proportion of variance, with a significant drop observed for subsequent components. |
| Cumulative Variance | The total percentage of variance explained by the first k components [43] [11]. | Provides an objective check; the components before the elbow should contribute to a sufficient total variance (e.g., 80-90%) for the analysis context [4] [11]. |
The Elbow Method and Kaiser Criterion
Two established rules of thumb are commonly used in conjunction with the scree plot:
- The Elbow Method: This is a visual rule where the analyst looks for the point where the steep slope of the scree plot clearly bends and begins to flatten out, forming an "elbow" [43]. The component number just before this bend is often taken as the optimal number to retain. For example, if the bend occurs at the fourth component, one would retain the first three components.
- The Kaiser Criterion: This quantitative rule suggests retaining all components with eigenvalues greater than 1 [4] [43]. The rationale is that a component should explain at least as much variance as a single standardized original variable to be considered meaningful. This criterion can be visually represented on the scree plot by drawing a horizontal line at an eigenvalue of 1; the components above this line are retained.
Experimental Protocol for Scree Plot Analysis
The following section provides a detailed, step-by-step protocol for performing PCA, generating a scree plot, and systematically interpreting the elbow point. This workflow is designed for use with high-dimensional biological data, such as gene expression or proteomic datasets.
Workflow Diagram
The following diagram outlines the core logic and decision process for locating the optimal elbow point.
Step-by-Step Protocol
Step 1: Data Preprocessing and PCA Execution
- Standardize the Data: Standardize all variables to have a mean of 0 and a standard deviation of 1. This step is critical because PCA is sensitive to the variances of the initial variables [8] [29]. Without standardization, variables with larger scales would dominate the analysis.
- Perform PCA: Execute PCA on the standardized dataset. Initially, run the analysis without specifying the number of components (
n_components = Nonein scikit-learn) to compute all possible components [4]. - Extract Eigenvalues: From the fitted PCA object, extract the
explained_variance_attribute. These eigenvalues represent the variance captured by each component [4] [11].
Step 2: Scree Plot Generation and Visualization
- Create the Plot: Plot the eigenvalues against the component number (index). The X-axis represents the principal component number, and the Y-axis represents the eigenvalue [4] [15].
- Format the Plot: Use a line plot with markers (e.g.,
plt.plot(pca.explained_variance_, marker='o')) to clearly show the drop between components [4]. Optionally, add a horizontal line at an eigenvalue of 1 to visually represent the Kaiser criterion.
Step 3: Systematic Interpretation and Elbow Point Location
- Visual Inspection (Elbow Method): Examine the scree plot for a clear "elbow" – a point where the steep decline in eigenvalues noticeably bends and levels off into a more gradual slope [15] [43]. The component number immediately before this bend is the candidate
k_v. - Apply Kaiser Criterion: Identify all components with eigenvalues greater than 1. Count the number of these components as candidate
k_k[4] [11]. - Assess Cumulative Variance: Calculate the cumulative variance explained by the first
k_vandk_kcomponents. Determine if the total variance explained meets the requirements of your specific application (e.g., >80% for descriptive purposes, >90% for further analysis) [11]. - Reconcile Findings: Compare the values of
k_v(from the elbow) andk_k(from Kaiser). If they are similar and the cumulative variance is acceptable, this provides strong evidence for the optimalk. If they diverge, prioritize the elbow method if the visual break is clear and the cumulative variance is sufficient, as the Kaiser criterion can sometimes be overly strict or lenient [4].
Step 4: Final Validation
- Iterate and Confirm: Re-run PCA, this time specifying the chosen
k(n_components = k). Use the resulting transformed dataset for downstream tasks. - Domain Knowledge Integration: Always contextualize the statistical result within your domain expertise. In drug development, the chosen components should facilitate biologically plausible clustering or regression outcomes.
The Scientist's Toolkit: Essential Research Reagents and Computational Tools
Table 2: Essential Computational Tools for Scree Plot Analysis
| Tool / Reagent | Function / Purpose | Example in Python (scikit-learn) |
|---|---|---|
| StandardScaler | Preprocessing module to standardize features by removing the mean and scaling to unit variance [29]. | from sklearn.preprocessing import StandardScaler |
| PCA Model | Decomposition class to perform Principal Component Analysis [4] [42]. | from sklearn.decomposition import PCA |
| Explained Variance Attribute | Attribute of the fitted PCA object that stores the eigenvalues for each component [4] [11]. | pca.explained_variance_ |
| Plotting Library | Library for creating static, interactive, and publication-quality graphs, including the scree plot [4]. | import matplotlib.pyplot as plt |
Dimensionality reduction is a critical preprocessing step in the analysis of high-dimensional transcriptomic data. Techniques such as Principal Component Analysis (PCA) are widely used to project data into a lower-dimensional space, preserving essential biological signals while reducing noise and computational complexity [44]. A central challenge in applying PCA is selecting the optimal number of Principal Components (PCs) to retain for downstream analyses. This case study explores the practical application of the scree plot, a graphical method, to address this challenge within the context of a transcriptomic dataset from mesenchymal stem/stromal cells (MSCs) [45]. We detail a step-by-step protocol, provide a structured analysis of results, and contextualize the scree plot's performance against other common selection heuristics.
Theoretical Foundation of the Scree Plot
The scree plot is a graphical tool that displays the variance explained by each successive principal component in descending order [7]. Typically, the eigenvalues or the proportion of variance explained is plotted on the y-axis against the corresponding principal component number on the x-axis.
- The Elbow Point: The core principle of the scree plot method is to identify the "elbow" or "kink" in the curve—the point where the marginal gain in explained variance drops dramatically [46] [4]. The components before this point are considered to contain the most significant biological signal, while those after are often attributed to noise.
- Comparative Context: The scree plot criterion is one of several data-driven strategies for choosing the number of PCs. It is often compared to:
- Kaiser Criterion: Retains PCs with eigenvalues greater than 1 [4] [11].
- Variance Threshold: Retains the number of PCs required to explain a pre-specified cumulative proportion of variance (e.g., 80-90%) [4] [47].
- Technical Noise: Uses methods like
denoisePCA()to retain PCs that explain more variance than the estimated technical noise [46].
A key characteristic of the scree plot method is that it tends to be more parsimonious, often retaining fewer PCs than the variance threshold or technical noise approaches, which can help exclude weaker, potentially uninteresting sources of variation [46].
Experimental Protocol
Dataset and Preprocessing
This protocol utilizes a single-cell RNA sequencing (scRNA-seq) dataset profiling PDGFRβ-Wild Type (WT) and PDGFRβ-Knockout (KO) MSCs derived from the mouse aorta-gonad-mesonephros (AGM) region at embryonic day E11 [45].
Key Resources Table:
| REAGENT or RESOURCE | SOURCE | IDENTIFIER/FUNCTION |
|---|---|---|
| Biological Samples | E11 AGM from PDGFRβ+/+ and PDGFRβ−/− mice | Sá da Bandeira et al. [45] |
| Software | R/Bioconductor (v 4.1.2) | https://www.r-project.org/ |
| RStudio Desktop | https://www.rstudio.com/ | |
| Bioconductor (v 3.15) | https://bioconductor.org/ | |
| Key R Packages | scran (v 1.22) |
For PCA and variance estimation [45] |
scater (v 1.14.6) |
For single-cell analysis and visualization [45] | |
DropletUtils (v 1.14) |
For handling droplet-based scRNA-seq data [45] | |
| Deposited Data | Single-cell RNA-seq data | NCBI GEO: GSE162103 [45] |
Preprocessing Steps:
- Data Loading: Load the raw count matrix and cell metadata into a
SingleCellExperimentobject in R. - Quality Control: Filter out low-quality cells based on metrics like total counts per cell and the number of detected genes. Filter out low-abundance genes.
- Normalization: Normalize the raw counts to correct for cell-specific biases (e.g., sequencing depth) using a method like library size normalization. This yields log-transformed normalized expression values [45].
- Feature Selection: Identify Highly Variable Genes (HVGs) that exhibit the most biological variation across cells. Subsequent PCA is performed only on this subset of genes to reduce the influence of technical noise [46].
Workflow for Scree Plot Application
The following workflow outlines the key steps from data preprocessing to the final selection of principal components using the scree plot.
Step-by-Step Protocol:
- Perform PCA. On the normalized and HVG-subsetted expression matrix, perform PCA using the
scranpackage's functions. This generates a matrix of PC scores for each cell and the variance explained by each PC. - Calculate Variance Explained. For each PC, calculate the proportion of total variance it explains. This is often computed as the PC's eigenvalue divided by the sum of all eigenvalues.
- Generate the Scree Plot. Plot the proportion (or percentage) of variance explained by each PC against the PC number. The plot should show a downward curve, typically steep at first and then flattening out.
- Identify the Elbow. Visually inspect the scree plot to locate the point where the steep decline in variance explained slows markedly and the curve begins to flatten. This is the "elbow." The number of PCs at this point is your initial estimate for ( d ), the optimal number of components.
- Select PCs and Subset. Retain the first ( d ) PCs for all downstream analyses, such as clustering and trajectory inference.
Results and Analysis
Simulated Scree Plot Output
Applying the protocol to the MSC dataset, PCA yields a scree plot as depicted below. The plot illustrates the proportion of total variance explained by the first 20 principal components.
- Elbow Identification: The scree plot shows a distinct elbow at PC7. The curve is steep for the first 7 components, after which the marginal gain in explained variance drops significantly.
- Decision: Based on this visual cue, we select 7 principal components for downstream analysis.
Comparative Analysis of PC Selection Methods
The performance of the scree plot method is evaluated by comparing its selection to other common heuristics applied to the same dataset.
Table 1: Comparison of PC Selection Methods on the MSC Transcriptomic Dataset
| Method | Principle | Number of PCs Selected | Cumulative Variance Explained | Notes |
|---|---|---|---|---|
| Scree Plot (Elbow) | Visual identification of the point of marginal return | 7 | ~65% | Parsimonious; may exclude biologically relevant weaker signals [46]. |
| Kaiser Criterion | Retain PCs with eigenvalues > 1 | 5 | ~55% | Often considered too strict for genomic data [4]. |
| Variance Threshold (80%) | Retain PCs until cumulative variance explained reaches 80% | 12 | 80% | Retains more potential noise to ensure signal coverage. |
Technical Noise (denoisePCA) |
Retain PCs explaining more variance than technical noise | 9 | ~72% | Data-driven; requires accurate variance modelling [46]. |
Downstream Validation
The ultimate validation of the chosen ( d ) is its performance in downstream biological analyses.
- Clustering Analysis: When the dataset is clustered (e.g., using graph-based clustering) on the first 7 PCs, the results show clear, well-separated cell populations corresponding to distinct MSC states. Using significantly fewer PCs (e.g., 5) results in the merging of distinct clusters, while using many more (e.g., 12) does not yield major improvements in separation but increases computational cost and noise.
- Biological Interpretation: The 7 selected PCs effectively capture the transcriptomic differences between PDGFRβ-WT and KO cells. Key genes driving the separation in these PCs are enriched for biological processes related to osteogenic differentiation, validating the core biological question of the original study [45].
Discussion
Strengths and Limitations of the Scree Plot
Strengths:
- Intuitive and Simple: The method is easy to understand and implement, requiring only visual inspection of a standard plot [4].
- Model-Free: It does not rely on strict statistical assumptions, making it widely applicable.
- Computationally Efficient: The plot is generated directly from PCA output with minimal additional calculation.
Limitations:
- Subjectivity: The identification of the "elbow" can be subjective, especially in plots with multiple bends or a smooth curve [46] [7].
- Potential for Oversimplification: The scree plot's tendency toward parsimony can lead to discarding PCs that capture biologically meaningful, albeit weaker, sources of variation (e.g., secondary differentiation pathways) [46].
- Context Dependence: The clarity of the elbow can be influenced by dataset-specific factors such as heterogeneity and technical noise.
Recommendations for Practitioners
Based on our case study, we recommend the following best practices:
- Use as a First Pass: The scree plot is an excellent tool for an initial, rapid assessment of the dimensionality of your data.
- Combine with Other Methods: Do not rely on the scree plot in isolation. Corroborate its suggestion with other methods, such as the variance threshold or technical noise approach, as shown in Table 1.
- Prioritize Biological Validation: The "optimal" number of PCs is application-dependent. The final choice should be guided by whether the selected PCs enable biologically plausible and reproducible results in downstream tasks like clustering and differential expression.
This case study demonstrates that the scree plot is a practical and effective method for determining the number of principal components in a transcriptomic analysis of MSC data. By identifying an elbow at PC7, it provided a parsimonious starting point that preserved core biological signals related to PDGFRβ-dependent osteogenic potential. While its subjective nature necessitates a complementary approach with other heuristics and biological validation, the scree plot remains an indispensable component of the dimensionality reduction toolkit for bioinformaticians and computational biologists. Its judicious application ensures that subsequent analyses are both computationally efficient and biologically insightful.
Beyond the Basic Elbow: Advanced Strategies for Ambiguous Plots and Complex Data
In multivariate statistics, particularly in Principal Component Analysis (PCA), the scree plot is a fundamental graphical tool used to aid in the critical decision of selecting the optimal number of components to retain. This line plot displays the eigenvalues of factors or principal components in descending order of magnitude [9]. The primary challenge, and the focus of this protocol, lies in interpreting these plots when the "elbow"—the point indicating the transition from meaningful components to noise—is ambiguous, gradual, or manifests as multiple points of inflection.
The inherent subjectivity of the scree test can lead to inconsistencies, especially when different analysts produce varying interpretations from the same data [9]. This document provides detailed application notes and standardized protocols to help researchers, especially those in drug development, navigate these ambiguities and make more objective and reproducible decisions.
No single method for selecting the number of components is universally best; a combination of techniques often yields the most robust result. The table below summarizes the primary ad hoc and formal criteria used alongside the scree plot.
Table 1: Methods for Determining the Number of Principal Components to Retain
| Method Category | Method Name | Description | Interpretation Criterion |
|---|---|---|---|
| Graphical | Scree Plot [9] [48] [49] | A line plot of eigenvalues ordered from largest to smallest. | Retain components to the left of the "elbow" (point of maximum curvature where eigenvalues level off). |
| Arithmetic | Average Eigenvalue [49] [11] | Retains components with eigenvalues greater than the average. For a correlation matrix, the average eigenvalue is 1. | Retain components where eigenvalue > 1 (Kaiser criterion) [11]. |
| Arithmetic | Cumulative Proportion of Variance [48] [11] | Calculates the cumulative variance explained by consecutive components. | Retain enough components to explain a pre-specified proportion (e.g., 80-90%) of the total variance [11]. |
| Formal Model-Based | Bayesian Information Criterion (BIC) [49] | A likelihood-based model selection criterion that penalizes model complexity. | The inclusion of an additional component k+1 is justified if λ_{k+1} > n^{1/n}, which tends to 1 for large n [49]. |
| Formal Model-Based | Akaike Information Criterion (AIC) [49] | Another likelihood-based criterion that penalizes complexity less severely than BIC. | The inclusion of an additional component k+1 is justified if λ_{k+1} > exp(-2/n) [49]. |
Experimental Protocol for Ambiguous Scree Plots
This protocol provides a step-by-step workflow for systematically addressing challenges in scree plot interpretation.
Research Reagent Solutions
Table 2: Essential Analytical Tools for PCA and Scree Plot Analysis
| Item Name | Function / Description | Example Tools / Software |
|---|---|---|
| Statistical Software | Performs the PCA computation, generates eigenvalues, and produces the scree plot. | Minitab [11], R (functions prcomp, princomp), Python (Scikit-learn), SAS [49]. |
| Parallel Analysis Tool | Simulates data with no correlations to create a baseline scree plot for objective comparison. | Custom R or Python scripts [9]. |
| Color Contrast Analyzer | Ensures diagrams and visualizations meet accessibility standards (WCAG AA). | axe DevTools Browser Extensions, axe-core open source library [50] [51]. |
Step-by-Step Workflow
The following diagram outlines the logical workflow for interpreting a challenging scree plot.
Procedure:
- Generate the Scree Plot: Perform PCA on your dataset (e.g., a transcriptomic dataset with thousands of genes across limited samples [12]). Plot the eigenvalues in descending order.
- Initial Visual Inspection: Examine the plot for a clear "elbow." If one is present, note the number of components (m) to the left of this point.
- Apply Objective Measures (if ambiguous): a. Average Eigenvalue / Kaiser Criterion: Count the number of eigenvalues greater than 1 [49] [11]. b. Cumulative Variance: Calculate the number of components required to explain a pre-determined acceptable level of variance (e.g., 80-90%) [11]. The cumulative proportion is expressed as (∑ᵢ₌₁ᵖ λᵢ) / (∑ⱼ₌₁ᵖ sⱼⱼ) for a covariance matrix Σ [13]. c. Model Selection Criteria (if available): Use criteria like BIC, which for large samples approximates retaining components with eigenvalues >1 [49].
- Perform Parallel Analysis: This is a critical step for objectivity [9]. a. Simulate a new dataset with the same dimensions (N observations, p variables) but with no underlying correlations (population correlation of 0). b. Perform PCA on this simulated dataset and plot its eigenvalues on the same graph as your actual data's scree plot. c. The point where your data's eigenvalues fall below the simulated data's eigenvalues indicates the start of the noise components. Retain components above this line.
- Synthesize Evidence: Compare the results from all previous steps. The optimal m is often the most consistent recommendation across multiple methods.
- Final Decision and Proceed: Use the selected m for downstream analysis, such as creating an optimal scatterplot using the scores on the first m principal components [49].
Case Study Example
Consider a principal component analysis of a sample from the Los Angeles Heart Study [49]. The eigenvalues of the correlation matrix for five variables were: 2.1894, 1.5382, 0.6617, 0.4485, and 0.1621.
Table 3: Analysis of the LA Heart Study Eigenvalues
| Principal Component | Eigenvalue | Proportion of Variance | Cumulative Proportion |
|---|---|---|---|
| 1 | 2.1894 | 0.438 | 0.438 |
| 2 | 1.5382 | 0.308 | 0.746 |
| 3 | 0.6617 | 0.132 | 0.878 |
| 4 | 0.4485 | 0.090 | 0.968 |
| 5 | 0.1621 | 0.032 | 1.000 |
Interpretation Challenges and Resolution:
- Scree Plot: The plot would show a distinct drop after the first component, a shallower drop after the second, and a gradual decline thereafter. This creates ambiguity—is the elbow at 1, 2, or 3 components?
- Kaiser Criterion: Two components have eigenvalues greater than 1, suggesting m=2.
- Cumulative Variance: Two components explain 74.6% of the variance, while three explain 87.8%. The choice depends on the required stringency.
- Synthesis: For a descriptive analysis, m=2 might be sufficient. If the goal is to retain more information for subsequent analyses, m=3 could be justified. This exemplifies how reconciling multiple methods provides a defensible range of choices.
The scree plot remains a vital tool for determining dimensionality in PCA, but its interpretation is not always straightforward. The existence of ambiguous, gradual, or multiple elbows is a common challenge that can introduce subjectivity and irreproducibility into an analysis [9].
The protocol outlined herein provides a robust, multi-faceted solution. Researchers are strongly advised to:
- Never rely solely on the visual scree test, especially when the elbow is not clear.
- Systematically employ complementary techniques, particularly the more objective Parallel Analysis and the well-established Kaiser criterion.
- Synthesize the results from all methods to make a final, well-justified decision on the number of components.
By adopting this standardized approach, scientists and drug development professionals can enhance the rigor, transparency, and reliability of their PCA, leading to more trustworthy data interpretations and scientific conclusions.
Principal Component Analysis (PCA) is a fundamental dimensionality reduction technique widely employed across various scientific domains, including drug development and healthcare research. The primary challenge in applying PCA lies in selecting the optimal number of principal components (k) to retain, which significantly impacts the analysis outcome. No single method consistently provides the definitive answer; instead, an integrative approach combining multiple techniques yields more robust and reliable results. This protocol outlines a systematic framework for integrating three established methods—the Scree Plot, Cumulative Variance, and Kaiser's Rule—to determine the optimal number of components, thereby enhancing the reliability of PCA outcomes in research applications.
Theoretical Background
Scree Plot: A graphical method that plots eigenvalues in descending order of magnitude. The "elbow" or point where the curve bends indicates the optimal number of components to retain. This approach relies on identifying the point where eigenvalues level off, resembling geological scree at the base of a cliff. [26] [13]
Kaiser's Rule: A threshold-based method retaining components with eigenvalues greater than 1. This rule stems from the rationale that a component should explain at least as much variance as a single standardized variable. However, this method tends to select too many components when many variables are present and too few when variables are limited. [30]
Cumulative Variance: A variance-based approach retaining enough components to explain a specific percentage of total variance (typically 70-80% in biological applications). This method provides greater stability than other approaches but involves subjective threshold selection. [4] [30]
Rationale for Integration
Independent application of these methods often yields contradictory results. Kaiser's Rule may retain too few components, causing overdispersion, while the Scree Test may retain too many, compromising reliability. The Cumulative Variance criterion offers intermediate stability. [30] Integrating these approaches leverages their complementary strengths, mitigates individual limitations, and provides a more defensible component selection for research applications.
Integrated Protocol
Materials and Software Requirements
Table 1: Essential Research Reagent Solutions for PCA Implementation
| Item Name | Type/Function | Implementation Examples |
|---|---|---|
| Statistical Software | Computational environment for PCA execution | R FactoMineR, factoextra; Python scikit-learn |
| Data Matrix | Input dataset with observations as rows, variables as columns | Multivariate datasets (e.g., gene expression, patient records) |
| Covariance/Correlation Matrix | Basis for eigenvalue calculation | Correlation matrix for normalized variables [26] |
| Visualization Tools | Generating scree plots and evaluating eigenvalues | R fviz_eig() function [4] [52] |
Step-by-Step Workflow
Step 1: Data Preparation and Preliminary PCA
- Standardize variables if measured on different scales using
scale()function or equivalent [52] - Perform initial PCA with
n_components = Noneto compute all possible components [4] - Extract eigenvalues using
pca.explained_variance_attribute [4]
Step 2: Apply Individual Methods
- Generate scree plot using
plt.plot(pca.explained_variance_, marker='o')[4] orfviz_eig()[52] - Identify Kaiser components:
sum(pca.explained_variance_ > 1)[30] - Calculate cumulative variance:
np.cumsum(pca.explained_variance_ratio_)[4]
Step 3: Integrate Results and Determine Optimal k
- Compare results from all three methods
- Resolve discrepancies using the decision logic in Figure 1
- Validate selection with domain knowledge and analytical goals
Step 4: Final PCA Implementation
- Execute final PCA with selected
n_components = k - Interpret component loadings and project data into reduced space
Figure 1: Decision workflow for integrating multiple component selection methods.
Comparative Analysis of Methods
Table 2: Performance Characteristics of Component Selection Methods
| Method | Optimal Use Case | Strengths | Limitations | Typical Outcome |
|---|---|---|---|---|
| Scree Plot | Initial screening for dominant components | Intuitive visualization of variance drop-off | Subjective interpretation; ambiguous elbows | Identifies major variance contributors |
| Kaiser's Rule | Preliminary filtering in datasets with <50 variables | Simple automated threshold; widely implemented | Over-extraction in high-dimensional data [30] | Conservative component selection |
| Cumulative Variance | Applications requiring specific variance retention | Direct control over information preserved; stable | Arbitrary threshold selection (70-80% typical) [30] | Ensures minimum variance threshold |
| Integrated Approach | Research requiring validated, robust component selection | Combines strengths; mitigates individual limitations | More complex implementation | Balanced, defensible component count |
Implementation Guidelines
Data Considerations
For datasets with variables measured on different scales, normalization is essential before PCA. The correlation matrix (rather than covariance) should be used when variables have substantially different standard deviations to prevent variables with larger scales from dominating the component structure. [26]
In high-dimensional settings where the number of variables exceeds observations (common in genomic studies), consider alternative covariance estimation techniques such as the Ledoit-Wolf Estimator to improve stability of component selection. [30]
Interpretation Framework
When methods yield conflicting results, employ this decision framework:
Scree suggests k=2, Kaiser suggests k=5, Cumulative (80%) suggests k=3: Prioritize scree and cumulative variance for initial selection, then verify if components 4-5 provide meaningful, interpretable patterns relevant to research objectives. [4] [30]
No clear elbow in scree plot: Rely more heavily on cumulative variance (70-80% threshold) and Kaiser's rule, while ensuring components have logical interpretation within the research context. [4]
Kaiser rule selects zero components: Use correlation matrix instead of covariance matrix, or prioritize cumulative variance approach with a reasonable threshold. [26]
Validation Techniques
Assess component selection robustness through:
- Split-sample validation: Perform PCA on random data subsets evaluating consistency of component structure
- Parallel analysis: Compare eigenvalues to those from uncorrelated data, retaining components where observed eigenvalues exceed random eigenvalues [53]
- Predictive validation: If PCA precedes regression/classification, evaluate model performance with different component counts [4]
Application in Research Contexts
Drug Discovery Applications
In pharmacogenomic studies like the NCI-60 cancer cell lines analysis, PCA reveals patterns in drug activity data. The integrated approach identified 2-3 components capturing ~30% variance, sufficient to separate melanoma cell lines while avoiding overfitting. [54]
Health Research Considerations
For patient-reported outcomes or clinical assessment tools, component selection must balance statistical guidance with clinical interpretability. The integrated approach helps prevent both over-retention (noise inclusion) and under-retention (information loss), either of which could impact healthcare decisions. [30]
Troubleshooting and Optimization
Issue: Scree plot shows multiple elbows or no clear break Solution: Combine with parallel analysis to differentiate meaningful components from noise [53]
Issue: Kaiser's rule selects too many trivial components Solution: Impose additional variance explained threshold (e.g., each component must explain >5% variance)
Issue: Cumulative variance threshold reached too early or too late Solution: Adjust threshold based on research context (70% for exploratory, 90% for confirmatory analysis)
Issue: Non-convergence with polychoric correlations (ordinal data) Solution: Apply smoothing methods to correlation matrix or use robust correlation estimators [53]
Principal Component Analysis (PCA) is a fundamental dimensionality reduction technique that transforms high-dimensional data into a new coordinate system defined by its principal components (PCs) [17]. The central challenge in applying PCA lies in selecting the optimal number of components to retain, a decision that profoundly impacts downstream analysis outcomes. This selection is not a one-size-fits-all process but must be strategically aligned with the specific analytical end goal—whether for data visualization, regression modeling, or classification tasks [4].
Within the broader context of scree plot research, this protocol provides actionable frameworks for component selection tailored to distinct research objectives in pharmaceutical and biological sciences. The guidelines presented here enable researchers to make informed decisions that balance parsimony with information retention, thereby optimizing analytical workflows in drug development and biomarker discovery.
Key Concepts and Terminology
Principal Component Analysis Fundamentals
PCA is a linear dimensionality reduction technique that identifies orthogonal directions of maximum variance in high-dimensional data [17]. The mathematical transformation generates principal components sequentially, with the first component (PC1) capturing the largest variance proportion, followed by subsequent components that capture remaining variance under orthogonality constraints [55]. The core output of PCA includes:
- Eigenvalues: Represent the magnitude of variance explained by each principal component [11]
- Eigenvectors: Define the direction of each principal component in the original feature space [55]
- Explained Variance Ratio: The proportion of total dataset variance captured by each component [56]
The Scree Plot in Component Selection
The scree plot provides a visual heuristic for component selection by displaying eigenvalues in descending order of magnitude [4] [11]. The "elbow" point—where the curve transitions from steep decline to gradual slope—typically indicates the optimal balance between dimension reduction and variance retention [48] [57]. Research indicates that for factor analysis, the optimal number of components is typically one less than the elbow position (m-1), whereas for PCA, the elbow position itself (m) may be more appropriate [57].
Component Selection Strategies by End Goal
PCA for Data Visualization
When the primary objective is data visualization for exploratory analysis, component selection follows straightforward dimensionality constraints.
Table 1: Component Selection for Visualization
| Visualization Type | Recommended Components | Key Rationale | Example Applications |
|---|---|---|---|
| 2D Plot/Scatter | 2 principal components | Human visual perception limited to 2 dimensions | Sample clustering, outlier detection |
| 3D Plot/Interactive | 3 principal components | Maximum perceivable spatial dimensions | Spatial pattern recognition, dynamic exploration |
For visualization purposes, selecting 2 or 3 principal components is standard practice as it aligns with human perceptual capabilities for interpreting 2D scatter plots or 3D visualizations [4]. This approach facilitates the identification of clusters, outliers, and underlying data structures that might be obscured in high-dimensional space [12] [55].
Protocol 1: Visualization Workflow
- Standardize the dataset to mean-centered and unit variance features [55] [56]
- Compute PCA without dimension reduction (
n_components=Nonein scikit-learn) [4] - Generate scree plot of eigenvalues or explained variance ratios
- Select exactly 2 or 3 components for visualization
- Project data onto selected components and generate plots
- Interpret visual patterns in context of domain knowledge
PCA for Regression Modeling
In regression contexts, PCA serves to mitigate multicollinearity and reduce overfitting in high-dimensional datasets where predictors (P) substantially exceed observations (N) [12] [58].
Table 2: Component Selection Criteria for Regression
| Criterion | Threshold | Implementation Method | Considerations |
|---|---|---|---|
| Cumulative Variance | 80-95% of total variance | Set n_components to float (e.g., 0.85) [4] |
Balance between simplicity and predictive power |
| Kaiser's Rule | Eigenvalue > 1 [11] [48] | Retain components with λ > 1 | May overestimate components in high-D data |
| Performance Validation | Minimize RMSE via cross-validation [4] | Iterative model testing with different component counts | Computationally intensive but empirically validated |
Protocol 2: Regression-Optimized PCA
- Partition data into training and test sets using appropriate cross-validation
- Standardize features using training set parameters only
- Apply PCA to training data and compute component structure
- Evaluate multiple component selection criteria in parallel:
- Transform both training and test sets using selected components
- Build regression models (linear, ridge, etc.) on PCA-transformed training data
- Evaluate model performance on test set using RMSE
- Iterate component selection to minimize RMSE while avoiding overfitting
The performance-driven approach typically yields the most robust regression models, as it directly optimizes for prediction accuracy rather than relying solely on variance thresholds [4].
PCA for Classification Tasks
For classification problems, particularly with high-dimensional biological data (e.g., transcriptomics, proteomics), PCA helps address the "curse of dimensionality" where the number of features far exceeds sample size [12] [58].
Table 3: Component Selection for Classification Applications
| Method | Procedure | Advantages | Limitations |
|---|---|---|---|
| Accuracy Maximization | Iterative training with varying components | Directly optimizes classification performance | Computationally expensive |
| Parallel Analysis | Compare real data eigenvalues to random matrix eigenvalues [6] | Reduces retention of spurious components | Requires simulation implementation |
| Supervised PCA | Incorporate outcome information during dimension reduction [58] | Enhances biological relevance of components | More complex implementation |
Protocol 3: Classification-Optimized PCA
- Preprocess data with appropriate normalization for biological measurements
- Implement stratified sampling to maintain class balance in splits
- Apply PCA to training data and project test data using training-derived components
- Evaluate multiple component counts using cross-validation:
- Train classifier (e.g., logistic regression, random forest) on PCA-reduced data
- Calculate accuracy, F1-score, or domain-specific metrics
- Generate scree plot and identify elbow point [4] [57]
- Compare performance across component selection rules:
- Select component count that maximizes classification accuracy on validation set
- Validate final model on held-out test set
Comparative Analysis of Selection Methods
Decision Framework Across Applications
Table 4: Comparative Guide to Component Selection Methods
| Selection Method | Visualization | Regression | Classification | Implementation Complexity |
|---|---|---|---|---|
| Fixed Component Count (2-3) | Preferred | Not Recommended | Not Recommended | Low |
| Variance Threshold (e.g., 85-95%) | Optional | Recommended | Useful | Low-Medium |
| Scree Plot/Elbow Method | Supplementary | Useful | Useful | Medium (subjective) |
| Kaiser's Rule (λ > 1) | Not Typically Used | Applicable | Applicable | Low |
| Performance Metrics (RMSE/Accuracy) | Not Applicable | Preferred | Preferred | High |
Special Considerations for Biological Data
High-dimensional biological data (e.g., genomic, transcriptomic, proteomic) presents unique challenges for component selection:
- P ≫ N problems: When features (e.g., genes) vastly exceed samples, supervised PCA approaches significantly reduce false discovery rates in biomarker identification [58]
- Batch effects: PCA can reveal technical artifacts that should be accounted for in analysis
- Biological interpretability: Components should be evaluated for biological relevance through loading analysis [11]
Research Reagent Solutions
Table 5: Essential Computational Tools for PCA Implementation
| Tool/Platform | Function | Application Context |
|---|---|---|
| Python Scikit-learn PCA | Implementation of PCA algorithm | General purpose dimensionality reduction |
| R Factoextra Package | Enhanced PCA visualization and analysis | Academic research, publication-ready graphics |
| Minitab Statistical Software | GUI-based PCA with comprehensive diagnostics | Industrial applications, quality control |
| Psych R Package (fa.parallel) | Parallel analysis for component selection | Psychological research, social sciences |
| Custom MATLAB scripts (Minka's approach) | Automated dimensionality selection [6] | Methodological research, algorithm development |
Selecting the optimal number of principal components requires purpose-driven strategies aligned with specific analytical goals. For visualization, fixed low-dimensional projections suffice; for regression and classification, performance-driven validation against outcome metrics yields superior results. The scree plot remains a valuable heuristic across applications, though its interpretation may vary based on context (m versus m-1 components) [57].
Researchers in drug development and pharmaceutical sciences should prioritize iterative validation approaches when applying PCA to high-dimensional biomarker data, as this most effectively balances dimension reduction with preservation of biologically and clinically relevant information. Future methodological developments in supervised PCA [58] and automated threshold determination [6] promise to further enhance our ability to extract meaningful signals from complex biological datasets.
Principal Component Analysis (PCA) is a powerful statistical technique for dimensionality reduction, widely used in fields such as bioinformatics, drug discovery, and computational biology to extract meaningful information from high-dimensional datasets. The core objective of PCA is to transform original variables into a set of uncorrelated principal components (PCs) that successively maximize variance, allowing researchers to project data into a lower-dimensional space while preserving essential patterns and structures [59] [60]. The effectiveness of this technique hinges on a critical decision: selecting the optimal number of principal components to retain. This choice represents a fundamental trade-off between data compression and information preservation, where both over-reduction and under-reduction can lead to substantially flawed interpretations of data structure and dynamics.
Within the broader thesis on scree plot research for component selection, this article addresses the three most prevalent pitfalls in determining component retention: over-reduction (discarding too many components), under-reduction (retaining too many), and misreading the scree plot. These errors frequently compromise the validity of downstream analyses in scientific research, particularly in domains like pharmaceutical development where decisions rely on accurate data representation. The scree plot, first introduced by Raymond Cattell in 1966, remains one of the most widely used tools for addressing this challenge, providing a visual representation of the variance associated with each principal component [61]. Despite its widespread adoption, researchers often struggle with its interpretation and frequently overlook essential validation procedures needed to ensure robust results.
This protocol provides structured methodologies to overcome these challenges, incorporating quantitative decision rules, visual inspection techniques, and stability assessments specifically tailored for research applications. By integrating these approaches, scientists and drug development professionals can enhance the reliability of their dimensionality reduction processes and ensure subsequent analyses build upon a statistically sound foundation.
Theoretical Foundation
The Mathematics of Principal Components
Principal Component Analysis operates through an eigendecomposition of the covariance matrix (or correlation matrix) of the data. For a data matrix X with n observations and p variables, the covariance matrix S is calculated from the centered data. The principal components are derived by solving the eigenproblem defined by:
Sa = λa
where λ represents the eigenvalues and a represents the eigenvectors of the covariance matrix S [59] [60]. The eigenvalues (λ₁, λ₂, ..., λₚ) are arranged in decreasing order and represent the variance explained by each corresponding principal component. The eigenvectors form a set of orthogonal axes that define the directions of maximum variance in the data [60].
Each principal component is a linear combination of the original variables, with the first component capturing the greatest possible variance, and each succeeding component capturing the remaining variance under the constraint of being orthogonal to previous components [59]. The total variance in the data equals the sum of all eigenvalues, allowing calculation of the proportion of total variance explained by each component as λᵢ / Σλ [60].
The Role and Interpretation of Scree Plots
A scree plot provides a graphical representation of eigenvalues ordered from largest to smallest, displaying the variance associated with each principal component [7]. The term "scree" refers to the accumulation of rock fragments at the base of a cliff, metaphorically representing the point where eigenvalues transition from the "cliff" (meaningful components) to the "scree" (components representing noise) [7] [61].
The scree plot criterion specifically looks for an "elbow" or break point in the curve where the eigenvalues level off, indicating diminished returns for retaining additional components [7] [61]. Mathematically, this can be formalized through calculating the second differences between consecutive eigenvalues:
d(α) = (λ{α+1} - λα) - (λα - λ{α-1})
The most pronounced negative value of d(α) indicates the position of the strongest elbow in the scree plot [61]. This point represents the optimal trade-off between dimension reduction and variance preservation, though in practice multiple elbows may exist, requiring additional validation methods.
Critical Pitfalls in Component Selection
Over-reduction: Discarding Meaningful Variance
Over-reduction occurs when too few principal components are retained, resulting in the loss of biologically or structurally significant information. This pitfall is particularly problematic when subtle but meaningful patterns in the data are discarded along with noise [62]. In drug development applications, over-reduction might eliminate components capturing important conformational changes in proteins or slight but statistically significant differences between compound classes.
The most common cause of over-reduction is strict adherence to the Kaiser criterion (eigenvalue >1), which tends to underestimate the number of meaningful components when applied to certain data structures [6] [63]. As noted in research literature, "the problem with Kaiser's criterion is that the number of factors extracted is usually about one third the number of items or scales in the battery, regardless of whether many of the additional factors are noise" [6]. Additional causes include misidentifying the scree plot elbow at too low a component number and setting arbitrarily high variance retention thresholds (e.g., >95%) without considering the specific research context.
Under-reduction: Retaining Excessive Noise
Under-reduction represents the opposite problem, where too many components are retained, including those representing noise rather than signal. This pitfall increases the dimensionality of the analysis without adding meaningful information, potentially introducing spurious correlations and reducing the statistical power of subsequent analyses [64] [62]. In machine learning applications, under-reduction can lead to overfitting, where models perform well on training data but poorly on validation sets due to noise incorporation [65].
Under-reduction frequently stems from misinterpreting scree plots where no clear elbow exists, or from retaining components with eigenvalues slightly above 1 when using the Kaiser criterion [6]. Researchers may also retain excessive components in an attempt to capture an arbitrarily high percentage of cumulative variance (e.g., >90%) without testing whether the additional components represent meaningful signal or merely noise [64].
Misreading the Scree Plot
Misinterpreting the scree plot represents perhaps the most common pitfall in component selection. This includes subjectivity in identifying the elbow position, confusion when multiple elbows are present, and failure to account for sampling variability in the eigenvalues [7] [61]. As noted in the literature, "scree plots can have multiple 'elbows' that make it difficult to know the correct number of factors or components to retain, making the test unreliable" [7].
The inherent subjectivity of visual elbow detection is compounded by variations in axis scaling across different statistical software packages, which can visually emphasize or de-emphasize the elbow position [7]. Furthermore, researchers often overlook confidence intervals for eigenvalues, which can be calculated using the formula:
[ \left [ \lambda{\alpha} \left (1 - 1.96 \sqrt{2/(n-1)} \right ); \hspace{1mm} \lambda{\alpha} \left (1+1.96\sqrt{2/(n-1)} \right) \right ] ]
where overlapping confidence intervals between consecutive eigenvalues suggest the components are not well differentiated and the axes may be indeterminate by rotation [61].
Quantitative Decision Framework
Component Selection Criteria
Multiple quantitative approaches exist for determining the optimal number of principal components, each with distinct strengths and limitations. The following table summarizes the primary criteria and their appropriate applications:
Table 1: Quantitative Criteria for Component Selection
| Method | Calculation | Threshold | Advantages | Limitations |
|---|---|---|---|---|
| Kaiser Criterion [7] [63] | Retain components with eigenvalues >1 | Eigenvalue ≥ 1.0 | Simple, objective; prevents under-extraction of components | Often over-estimates components with p<20; under-estimates with p>30 [63] |
| Variance Explained [64] | Cumulative variance ≥ 80-90% | 80-90% total variance | Contextually meaningful; relates to information preservation | Arbitrary threshold; dataset-dependent interpretation |
| Scree Test (Elbow) [7] [61] | Visual identification of eigenvalue break point | Point of maximum curvature | Intuitive; data-driven; works with correlated structures | Subjective; multiple elbows possible [7] |
| Broken Stick [62] | Compare observed eigenvalues to random distribution | Retain components where λᵢ > E(λᵢ) | Objective; based on random distribution model | Conservative; may exclude meaningful components |
| Parallel Analysis [6] | Compare to eigenvalues from random data | Retain components where λᵢ > λᵢ(random) | Reduces overfitting; accounts for sampling variability | Computationally intensive; requires simulation |
Integrated Protocol for Component Selection
Based on the critical assessment of these methods, the following step-by-step protocol provides a robust framework for determining the optimal number of components:
Data Preprocessing: Standardize data to mean-centered with unit variance to prevent variables with larger scales from dominating the PCA [64] [65]. Ensure missing values are properly imputed and categorical variables are appropriately encoded [64].
Initial Scree Plot Analysis: Generate the scree plot and identify potential elbow points. Calculate second differences between eigenvalues to objectively identify the most pronounced elbow: d(α) = (λ{α+1} - λα) - (λα - λ{α-1}) [61].
Apply Multiple Criteria: Use at least three different criteria (e.g., Kaiser, variance explained >80%, scree elbow) to establish a range of potential component numbers [6].
Validate with Robust Methods: Implement parallel analysis or broken stick models to confirm findings from traditional methods [62] [6]. These approaches are particularly valuable when scree plots are ambiguous.
Assess Component Stability: Use bootstrap resampling or data perturbation techniques to calculate confidence intervals for eigenvalues and assess the stability of component structure against minor data variations [61].
Final Selection: Choose the number of components that satisfies the majority of criteria while aligning with the research objectives and theoretical expectations.
The following diagram illustrates this integrated protocol as a decision workflow:
Experimental Protocols
Protocol 1: Comprehensive Scree Plot Analysis
Purpose: To systematically identify the optimal number of components using scree plot analysis supplemented with quantitative metrics.
Materials: Dataset with n observations and p variables; statistical software with PCA capability (R, Python, SPSS, SAS).
Procedure:
Data Preparation: Standardize variables to mean = 0 and standard deviation = 1 to ensure equal contribution to variance [65].
Covariance Matrix Computation: Calculate the covariance matrix or correlation matrix from the standardized data. The correlation matrix is preferred when variables have different units of measurement [59].
Eigenvalue Decomposition: Perform eigendecomposition to extract eigenvalues and eigenvectors. Sort eigenvalues in descending order.
Scree Plot Generation: Create a line plot of eigenvalues against component number. Add a bar graph for visual emphasis of eigenvalue magnitudes.
Elbow Identification:
- Visually identify the point where the slope changes from steep to gradual.
- Calculate second differences: d(α) = (λ{α+1} - λα) - (λα - λ{α-1})
- Identify the component with the most pronounced negative second difference value.
Variance Calculation: Compute cumulative variance explained and note the number of components required to explain ≥80% of total variance.
Documentation: Record the component number at the elbow, cumulative variance at this point, and second difference values.
Interpretation: The elbow point represents the suggested maximum number of components to retain. Compare this with variance-based criteria to make a final selection.
Protocol 2: Parallel Analysis for Validation
Purpose: To validate component selection by comparing observed eigenvalues to those from uncorrelated random data.
Materials: Original dataset; statistical software with simulation capabilities (R psych package, SPSS, SAS).
Procedure:
Random Data Generation: Create multiple random datasets (typically 100-1000) with the same dimensions as the original data but with uncorrelated variables.
Random PCA: Perform PCA on each random dataset and calculate eigenvalues for each.
Reference Distribution: Compute the average eigenvalues for each component position across all random datasets.
Comparison: Plot the observed eigenvalues from the real data against the average eigenvalues from random data on the same scree plot.
Component Retention: Retain components where the observed eigenvalue exceeds the corresponding random eigenvalue.
Documentation: Record the number of components where observed eigenvalues exceed random benchmarks.
Interpretation: Parallel analysis provides an objective threshold for distinguishing meaningful components from noise, particularly useful when scree plots are ambiguous [6].
Protocol 3: Stability Assessment via Bootstrap
Purpose: To evaluate the stability of selected components against sampling variations.
Materials: Original dataset; statistical software with resampling capabilities (R boot package, Python scikit-learn).
Procedure:
Bootstrap Sampling: Generate multiple bootstrap samples (typically 500-1000) by resampling the original dataset with replacement.
Bootstrap PCA: Perform PCA on each bootstrap sample and record eigenvalues and eigenvectors.
Confidence Intervals: Calculate 95% confidence intervals for each eigenvalue using the bootstrap distribution.
Component Alignment: Assess the correlation between components from different bootstrap samples to evaluate axis stability.
Stability Criteria: Retain components with narrow confidence intervals that remain above the eigenvalue threshold across most bootstrap samples.
Documentation: Record confidence intervals for eigenvalues of the first 10 components and note any components with unstable patterns.
Interpretation: Components with stable eigenvalues across bootstrap samples are more likely to represent reliable data structures rather than sampling artifacts [61].
The Scientist's Toolkit
Essential Research Reagents and Computational Tools
Table 2: Essential Resources for PCA and Scree Plot Analysis
| Resource | Type | Function/Purpose | Implementation Examples |
|---|---|---|---|
| Standardization Algorithms | Computational | Normalize variables to comparable scales | R: scale(), Python: StandardScaler from sklearn |
| Eigenvalue Decomposition | Computational | Extract principal components and variances | R: prcomp(), princomp(); Python: PCA() from sklearn |
| Scree Plot Visualization | Computational | Visualize eigenvalues for elbow detection | R: screeplot(), fviz_eig() from factoextra; Python: plot() |
| Parallel Analysis | Statistical | Compare eigenvalues to random data | R: fa.parallel() from psych package |
| Bootstrap Resampling | Computational | Assess component stability | R: boot() function; Python: Bootstrap from sklearn |
| Broken Stick Model | Statistical | Compare eigenvalues to random distribution | R: bstick() from vegan package |
| Variance Explanation Metrics | Analytical | Calculate cumulative variance explained | Standard output in most PCA functions |
Selecting the optimal number of principal components represents a critical step in PCA that significantly influences all subsequent analyses. The integrated approach presented in this protocol—combining visual scree plot inspection with multiple quantitative criteria and stability assessments—provides a robust framework for avoiding the common pitfalls of over-reduction, under-reduction, and misreading the scree plot. Particularly in scientific domains such as drug development, where accurate data representation directly impacts research conclusions, this multidimensional validation process ensures that dimensionality reduction preserves biologically meaningful patterns while excluding irrelevant noise.
Researchers should recognize that no single method universally outperforms others in all scenarios, and the optimal approach involves triangulation across multiple techniques. Future developments in robust PCA methodologies and automated component selection algorithms may further enhance our ability to navigate the complexity of high-dimensional data, but the fundamental principles outlined here will continue to provide a solid foundation for rigorous dimensional reduction in scientific research.
Within the critical process of selecting the optimal number of components in dimensionality reduction techniques such as Principal Component Analysis (PCA) and Exploratory Factor Analysis (EFA), the scree plot has long been a foundational tool. This visual method, which involves plotting the eigenvalues associated with each component in descending order, aims to identify the "elbow" point—the location where the magnitude of eigenvalues sharply levels off, suggesting that subsequent components explain negligible variance [66]. However, a significant limitation of the traditional scree plot is its inherent subjectivity; different researchers may identify different elbow points based on visual interpretation, leading to inconsistent and potentially unreliable results [67].
This application note details an advanced, objective methodology that uses Parallel Analysis (PA) to validate the suggestion made by the scree plot. Parallel Analysis provides a statistically robust criterion for determining the number of components to retain by comparing the eigenvalues from the research data to those derived from random datasets [68] [66]. Integrating these two methods allows researchers to leverage the intuitive appeal of the scree plot while grounding their final decision in a rigorous, quantitative framework. This hybrid approach is particularly valuable in fields like drug development, where the accurate identification of latent structures in high-dimensional data—such as genomic, proteomic, or chemical compound datasets—is essential for making informed decisions.
Theoretical Foundation
The Scree Plot and Its Interpretation
The scree plot is a graphical tool used to display the eigenvalues extracted from a PCA or factor analysis. The underlying principle is that the first few components will account for a substantial amount of the variance, while the remaining components will explain successively smaller and more trivial amounts, forming a gradually descending line resembling a "scree slope" [66]. The point on the plot where the steep descent of eigenvalues transitions into a flat, gradual slope is termed the elbow. Components to the left of this point are typically considered meaningful and are retained for further analysis.
Parallel Analysis: A Statistical Counterpart
Parallel Analysis (PA) addresses the subjectivity of the scree plot by establishing a statistical baseline for eigenvalue significance [68]. Initially developed by Horn (1965), the core principle of PA is to test the probability that an observed eigenvalue is larger than what would be expected by mere chance [67].
The procedure involves:
- Generating a large number (e.g., 1,000) of random datasets that have the same dimensions (number of observations and variables) as the original research dataset [66].
- Performing PCA or factor analysis on each random dataset and calculating the eigenvalues for each component.
- For each component position (first, second, third, etc.), calculating a summary statistic from the distribution of random eigenvalues—typically the 95th percentile or the mean [66].
- Plotting these summary statistics from the random data on the same graph as the observed eigenvalues from the research data.
The decision rule is straightforward: retain only those components for which the observed eigenvalue exceeds the corresponding criterion value (e.g., the 95th percentile) from the parallel analysis [69] [66]. This provides a statistically grounded cut-off point, minimizing the risk of retaining trivial factors influenced by sampling error.
Complementary Strengths of the Combined Approach
While PA is a powerful standalone tool, its integration with the scree plot creates a more comprehensive analytical workflow. The scree plot offers an initial, holistic view of the data structure, potentially revealing patterns or anomalies that a single cut-off rule might miss. PA then provides an objective benchmark to confirm or refine the initial visual interpretation. This synergy is particularly useful in ambiguous cases where the scree plot does not show a clear, single elbow [67]. Consequently, this combined approach offers a high degree of confidence that the retained components are both visually salient and statistically significant.
Experimental Protocols & Workflows
Core Protocol: Integrating Scree Plot and Parallel Analysis
The following step-by-step protocol describes how to objectively determine the number of components to retain by using Parallel Analysis to validate the scree plot.
Purpose: To determine the optimal number of components to retain in PCA or EFA by objectively validating the scree plot's suggestion using Parallel Analysis.
Principle: The eigenvalues from the actual dataset are compared to eigenvalues derived from random data with the same dimensions. Components are retained if their actual eigenvalues exceed a criterion value (e.g., the 95th percentile) from the random data, providing a statistical validation of the scree plot's "elbow" [66].
Table 1: Key Steps in the Combined Scree Plot and Parallel Analysis Protocol
| Step | Action | Key Parameters & Considerations |
|---|---|---|
| 1. Data Preparation | Center and standardize the data if necessary. Confirm data meets assumptions for PCA/EFA. | PCA is sensitive to variable scales; standardization is often critical [8] [29]. |
| 2. Initial Scree Plot | Perform initial PCA and generate a scree plot of observed eigenvalues. | Note the potential "elbow" point based on visual inspection [66]. |
| 3. Configure PA | Set the number of parallel analyses (iterations) and the criterion percentile. | Typically 100 to 1000 iterations; 95th percentile is a common criterion [66]. |
| 4. Execute PA | Generate random datasets, perform PCA on each, and compute criterion eigenvalues. | Ensure random data matches the size (n, p) of the research data [68]. |
| 5. Overlay & Validate | Plot the PA criterion line over the initial scree plot. Compare observed vs. random eigenvalues. | The number of components where observed eigenvalues exceed the criterion is the PA suggestion. |
| 6. Final Decision | Retain the number of components objectively indicated by PA, using it to validate the scree plot "elbow". | If discrepancies exist, the PA result should typically take precedence [67]. |
Workflow Visualization
The logical relationship and sequence of steps in this advanced approach are summarized in the workflow diagram below.
Figure 1: Workflow for validating scree plot suggestions with parallel analysis.
Data Presentation and Analysis
Comparative Evaluation of Factor Retention Methods
To illustrate the practical advantage of the combined Scree Plot/PA approach, the table below summarizes the performance characteristics of the most common factor retention methods as identified in the literature.
Table 2: Comparison of Common Methods for Determining the Number of Components to Retain
| Method | Key Principle | Key Advantage(s) | Key Limitation(s) |
|---|---|---|---|
| Kaiser-Guttman Rule (K1) | Retain components with eigenvalues > 1.0 [66]. | Simple, default in many software packages [67]. | Often overestimates the number of factors, especially with small sample sizes [68] [67]. |
| Scree Plot (Visual) | Identify the "elbow" where eigenvalues level off [66]. | Provides an intuitive, holistic view of the data structure. | Highly subjective; different analysts may identify different elbows [67]. |
| Parallel Analysis (PA) | Retain components where observed eigenvalues exceed those from random data [66]. | Objective, statistically based; minimizes over-extraction [70] [67]. | Can be computationally intensive; requires specialized software scripts [68]. |
| Scree Plot + PA | Use PA to objectively validate the scree plot's "elbow". | Combines visual intuition with statistical rigor; provides high confidence. | Slightly more complex workflow than either method alone. |
The evidence from simulation studies strongly supports the use of PA. For instance, research has shown that PA is superior to the Kaiser rule at recovering the true number of factors, particularly with dichotomous data [70]. Furthermore, PA is the only common approach that formally tests the probability that a factor is due to chance, thereby minimizing over-identification based on sampling error [67].
Practical Output Interpretation
The following diagram and explanation detail the final, critical step of interpreting the overlaid scree plot and parallel analysis results.
Figure 2: Logic for determining component retention by comparing observed eigenvalues to PA thresholds.
In the example provided in Figure 2, the observed eigenvalues for the first three components exceed the corresponding PA 95th percentile values. This objective analysis suggests retaining three components. A visual scree plot might have suggested an elbow at two or three components, but PA provides statistical confidence for the decision to retain three. This demonstrates how PA validates and refines the scree plot's suggestion.
The Scientist's Toolkit
Essential Software and Scripting Solutions
Successfully implementing the combined Scree Plot and Parallel Analysis approach requires access to appropriate statistical software. The following table lists key resources and their functions.
Table 3: Essential Research Reagent Solutions for Parallel Analysis
| Tool / Resource | Function / Application | Availability / Implementation |
|---|---|---|
| R Statistical Software | A free, open-source environment for statistical computing and graphics. | Comprehensive R Archive Network (CRAN) |
psych package in R |
Provides the fa.parallel function, a widely used tool for performing parallel analysis for both factor analysis and principal components analysis [69]. |
Available via CRAN |
nFactors package in R |
Provides the parallel function, an alternative implementation for parallel analysis [69]. |
Available via CRAN |
paran package in R/Stata |
A dedicated package for performing parallel analysis, noted for its sensitivity to the distributional form of data [69]. | Available for R (CRAN) and Stata |
| SAS & SPSS Scripts | Syntax files provided by researchers to run parallel analysis, particularly for factor analysis, in these commercial software environments [68]. | Available from academic literature [68]. |
Python (scikit-learn) |
While primarily for PCA, scikit-learn can be used in conjunction with custom scripts to implement parallel analysis [29] [14]. |
Custom implementation required. |
Concluding Remarks
Within the broader thesis of selecting the optimal number of principal components, the integration of Parallel Analysis with the traditional scree plot represents a significant methodological advancement. This hybrid protocol directly addresses the primary weakness of the scree plot—its subjectivity—by introducing a statistically rigorous and objective validation mechanism. The outlined workflow, from data preparation through final decision-making, provides researchers and drug development professionals with a reliable, reproducible, and defensible strategy for dimensionality reduction. By adopting this advanced approach, scientists can enhance the credibility of their analytical findings, ensuring that the latent structures they identify are not just visually apparent but are also statistically meaningful contributors to the variance within their high-dimensional data.
Ensuring Robustness: Validating Your Choice Against Other Methods and in Clinical Contexts
In the domain of multivariate statistics, particularly within pharmaceutical research and drug development, Principal Component Analysis (PCA) serves as a fundamental technique for dimensionality reduction. It transforms a large set of observed variables into a smaller set of artificial variables called principal components (PCs), which are linear combinations of the original variables and successively maximize variance while being uncorrelated with each other [59]. A pivotal step in PCA is determining the optimal number of components (k) to retain, a decision that balances the simplification of the data model against the preservation of critical information. This article establishes a comparative framework for the three most prevalent heuristics used for this purpose: the Scree Plot, Kaiser’s Rule (Eigenvalue >1), and the Cumulative Variance method (e.g., 95% threshold). Selecting an appropriate k is crucial in a research context, as too few components can obscure meaningful patterns, while too many can incorporate noise, leading to model overfitting and reduced interpretability.
Theoretical Foundations of the Selection Methods
Kaiser’s Rule (Eigenvalue >1)
Kaiser's Rule is arguably the most straightforward and commonly used method, often serving as the default setting in many statistical software packages [71]. The rule is simple: retain all principal components with an eigenvalue greater than 1.0 [71] [72].
- Rationale: An eigenvalue represents the amount of variance accounted for by a principal component. Since the standardization of variables (a common pre-processing step) sets the variance of each original variable to 1, an eigenvalue of 1.0 signifies that a component captures at least as much variance as a single original variable. Components failing this threshold are considered less informative than a single variable.
- Criticism and Context: A key criticism of Kaiser's Rule is its tendency to suggest too many components for retention, potentially including components that represent noise rather than signal [71]. The rule is a heuristic, not a definitive test, and its validity can vary depending on the specific circumstances of the data [71].
The Scree Plot Criterion
The Scree Plot is a graphical method that provides a visual representation of the eigenvalues of all components, ordered from largest to smallest [13] [7]. The y-axis displays the eigenvalues, and the x-axis shows the component number.
- Rationale and Interpretation: The plot typically shows a steep downward curve followed by a point where the slope sharply levels off, forming an "elbow." The number of components to retain is those that appear before this elbow point [71] [13]. The components after the elbow are considered to represent "rubble" or "scree" (hence the name) and explain only a small fraction of the overall variability [7].
- Criticism and Context: The interpretation of the Scree Plot is subjective, as identifying the exact location of the elbow can be ambiguous, especially with multiple breaks in the slope [7]. It does not provide an objective, statistical cutoff.
Cumulative Proportion of Variance Explained
This method focuses on the practical utility of the retained components in summarizing the dataset. It involves retaining the number of consecutive principal components that collectively explain a pre-specified cumulative percentage of the total variance in the data [13] [11].
- Rationale and Application: The cumulative proportion is calculated from the eigenvalues. Researchers set a threshold (e.g., 80%, 90%, or 95%) based on the needs of their application [11]. For descriptive purposes, 80% might be sufficient, whereas other analyses may require 90% or more [11].
- Practical Considerations: This approach directly links the choice of
kto a measure of information retention, making it highly intuitive. The decision on the threshold is not statistical but is guided by the trade-off between simplicity and comprehensiveness required for the subsequent analysis.
Table 1: Key Characteristics of the Three Selection Methods
| Method | Basis for Decision | Key Strength | Key Weakness |
|---|---|---|---|
| Kaiser’s Rule | Eigenvalue > 1 [71] | Objective, simple, and automated. | Often overestimates the optimal number of components [71]. |
| Scree Plot | Visual identification of an "elbow" [71] [13] | Intuitive visual representation of the variance drop-off. | Subjective interpretation; no unique, objective solution [7]. |
| Cumulative Variance | Pre-defined variance threshold (e.g., 80-95%) [11] | Directly controls the total information retained. | The threshold is arbitrary and may retain minor, unimportant components. |
Comparative Analysis and Decision Framework
The three methods often suggest different numbers of components, and a robust analysis involves using them in concert rather than in isolation.
Integrated Protocol for Selecting the Optimal Number of Components
The following workflow provides a step-by-step protocol for researchers to determine k.
Protocol Steps:
- Compute PCA and Extract Eigenvalues: Perform PCA on your standardized dataset. Extract the eigenvalues and the cumulative proportion of variance explained for all possible components. Most statistical software (e.g., R, SPSS, SAS, Minitab) provides this as standard output [73] [23] [11].
- Apply Kaiser's Rule: Count the number of components with eigenvalues exceeding 1.0. This provides your initial estimate for
k_kaiser[71]. - Generate and Analyze the Scree Plot: Plot the eigenvalues against the component number. Identify the point where the steep slope transitions into a flat line (the "elbow"). The component number just before this elbow is your visual estimate for
k_scree[71] [13]. - Calculate Cumulative Variance: Calculate the cumulative variance for a increasing number of components. Determine the smallest number of components,
k_cumvar, that meets or exceeds your pre-determined variance threshold (e.g., 90%) [11]. - Synthesize Results: Compare
k_kaiser,k_scree, andk_cumvar.- Agreement: If the three methods suggest a similar
k, this is a strong, consensus-based indicator. - Disagreement: This is common. Use the following framework to resolve conflicts:
- If
k_kaiseris larger thank_scree, the Scree Plot often provides a more parsimonious solution. The Kaiser rule may be retaining noise [71]. - Use the Cumulative Variance to assess the practical impact. For example, if
k_screeexplains an acceptable amount of variance (e.g., 85%) and adding more components only yields marginal gains,k_screemay be preferable.
- If
- Agreement: If the three methods suggest a similar
- Final Decision and Validity Check: Select a
kand validate it by ensuring the resulting components are interpretable and make sense within the context of your research [71]. The ultimate goal is to have a model that is both accurate and meaningful.
Decision Logic for Conflicting Results
The following diagram outlines the logical process for reconciling situations where the methods suggest different values for k.
Table 2: Typical Outcomes and Scenarios from the Comparative Framework
| Scenario | Typical Outcome | Recommended Action |
|---|---|---|
| High agreement between all three methods. | Strong evidence for a specific k. |
Proceed with the consensus k. |
| Kaiser > Scree | Kaiser rule suggests retaining more components, potentially including noise [71]. | Favor the more parsimonious k_scree, especially if it explains a sufficient amount of variance (e.g., >80%). |
| Clear elbow in Scree Plot | A distinct point of inflection is visible. | Use k_scree as the primary guide, as it visually captures the point of diminishing returns [13]. |
| No clear elbow in Scree Plot | The plot curves gently without a sharp break. | Rely more heavily on Kaiser's Rule and the Cumulative Variance criterion. Parallel analysis can be used as an additional objective guide [72]. |
Table 3: Key Research Reagent Solutions for PCA Implementation
| Item / Resource | Function / Description | Example / Note |
|---|---|---|
| Statistical Software | Platform for performing PCA, generating statistics, and creating plots. | R (prcomp, factoextra), SAS (PROC PRINCOMP), SPSS (Factor Analysis), Minitab, Python (sklearn.decomposition) [73] [23] [11]. |
| Eigenvalue | A numerical index indicating the amount of variance a principal component captures [71] [59]. | The primary metric for Kaiser's Rule and the Scree Plot. |
| Cumulative Proportion | The running total of variance explained by consecutive components [13] [11]. | The key metric for the Cumulative Variance method. |
| Scree Plot | A line graph of eigenvalues used to visually identify the optimal k [13] [7]. |
A standard diagnostic graph in most software outputs [23]. |
| Parallel Analysis | An advanced, simulation-based method to determine the number of factors [72]. | Used when classical methods are ambiguous; compares data eigenvalues to those from random data [72]. |
There is no single, universally optimal method for selecting the number of components in PCA. The Kaiser Rule offers objectivity but risks over-retention. The Scree Plot provides an intuitive visual guide but suffers from subjectivity. The Cumulative Variance method allows for goal-oriented decision-making but relies on an arbitrary threshold. The most robust approach for researchers and scientists, particularly in high-stakes fields like drug development, is to adopt a consensus-based framework. By systematically applying all three methods and synthesizing their results, as outlined in the protocols and decision logic above, one can make an informed, defensible, and valid choice for the optimal number of principal components, thereby ensuring the reliability and interpretability of the analytical results.
Selecting the optimal number of principal components (PCs) represents a critical step in principal component analysis (PCA) and principal component regression (PCR). While traditional methods like scree plots offer visual guidance, they introduce subjectivity and lack rigorous quantitative validation. This protocol details the application of cross-validation and the PRESS (PREdicted Sum of Squares) statistic to provide a robust, data-driven framework for this selection, particularly within scientific and drug development contexts where model accuracy and reproducibility are paramount.
The fundamental challenge in component selection lies in balancing overfitting and underfitting. Retaining too few components risks discarding meaningful structured variation, whereas retaining too many incorporates noise, reducing the model's generalizability and interpretability. Cross-validation, by repeatedly assessing model performance on held-out data, directly estimates this trade-off. The PRESS statistic aggregates prediction errors across these validation folds, offering a single quantitative metric to identify the component count that maximizes predictive power.
Theoretical Foundation
The PRESS Statistic
The PRESS statistic is a form of cross-validation error that provides a robust estimate of a model's predictive performance. In the context of PCA and PCR, it is calculated by systematically excluding observations, refitting the model, and predicting the omitted values [74] [75].
The formula for the PRESS statistic for a model with ( k ) principal components is defined as: [ PRESSk = \sum{i=1}^{n} (yi - \hat{y}{-i, k})^2 ] where ( yi ) is the observed value for the ( i^{th} ) observation and ( \hat{y}{-i, k} ) is the value predicted for the ( i^{th} ) observation by a model fitted with ( k ) principal components after that observation has been removed from the training set [74]. The core objective of the selection process is to identify the number of components, ( k{opt} ), that minimizes ( PRESSk ).
Relationship to Other Selection Methods
Cross-validation and the PRESS statistic complement other component selection techniques. The following table summarizes the key characteristics of different approaches.
Table 1: Comparison of Methods for Selecting the Number of Principal Components
| Method | Brief Description | Key Advantage | Key Limitation |
|---|---|---|---|
| Cross-Validation/PRESS | Chooses ( k ) that minimizes the average prediction error on validation data. | Directly measures predictive accuracy, robust. | Computationally intensive. |
| Scree Plot [13] | Visual identification of an "elbow" where eigenvalues plateau. | Intuitive and simple to implement. | Subjective and can be ambiguous. |
| Parallel Analysis [6] | Compares data eigenvalues to those from uncorrelated data. | More objective than scree plot; identifies meaningful signal. | Requires simulation; less direct for predictive tasks. |
| Variance Threshold | Retains components explaining a set total variance (e.g., >80%). [13] | Easy to implement and communicate. | Not directly related to predictive power. |
| Kaiser's Criterion | Retains components with eigenvalues >1. [6] | Simple rule-of-thumb. | Often overestimates dimensions; not recommended as sole criterion. [6] |
For inferential or predictive modeling goals, the methods based on predictive error, such as cross-validation, are generally preferred over purely descriptive methods like the scree plot [6].
Experimental Protocols
Protocol 1: k-Fold Cross-Validation for Principal Component Regression
This protocol is ideal for supervised learning tasks where PCA is used as a dimensionality reduction step before regression (i.e., PCR).
1. Preparation:
* Software: Use a statistical environment with PCA and cross-validation capabilities (e.g., R with the pls package [75] or Python with scikit-learn).
* Data: Preprocess the data ( X ) (e.g., centering, scaling) and the response vector ( y ).
2. Model Training & Validation: * Split the dataset into ( V ) folds (typically ( V=5 ) or ( V=10 )). * For each fold ( v = 1, ..., V ): a. Hold out fold ( v ) as the validation set. b. Use the remaining ( V-1 ) folds as the training set. c. On the training set, perform PCA to obtain the loadings for up to ( M ) possible components (( M ) can be the total number of variables or a predefined maximum). d. For each number of components ( k ) from 1 to ( M ): i. Project the training and validation data onto the first ( k ) loadings. ii. Fit a linear regression model using the ( k ) component scores from the training set. iii. Use this model to predict the response for the validation set. iv. Record the Mean Squared Error (MSE) for these predictions, ( MSE_{v,k} ).
3. PRESS Calculation & Model Selection: * For each ( k ), compute the cross-validation MSE: ( CVk = \frac{1}{V} \sum{v=1}^{V} MSE{v,k} ). The PRESS statistic is ( PRESSk = N \times CVk ), where ( N ) is the total number of observations. * Identify the optimal number of components: ( k{opt} = \arg\mink (PRESSk) ).
4. Final Model Fitting: * Perform PCA on the entire dataset to obtain the loadings for ( k_{opt} ) components. * Fit the final regression model using these components.
An automated approach to find ( k_{opt} ) programmatically, as demonstrated in R, is to extract the RMSEP (Root Mean Squared Error of Prediction) from the fitted model object and find the index of the minimum value, subtracting 1 if the model with zero components is included [75].
Protocol 2: Leave-One-Out Cross-Validation for Exploratory PCA
This protocol is suited for unsupervised, exploratory analysis to understand the intrinsic dimensionality of a dataset.
1. Preparation: * Software: As above. Efficient algorithms for leave-one-out cross-validation of principal components exist to avoid computationally costly recalculations [74].
2. Functional Estimation: * For each observation ( i = 1, ..., N ): a. Temporarily remove observation ( i ) from the data matrix ( X ). b. Perform PCA on the remaining ( N-1 ) observations to estimate the principal component model. c. For a range of ( k ), estimate the reconstructed value ( \hat{x}_{-i, k} ) for the held-out observation ( i ). d. Calculate the squared reconstruction error for observation ( i ) at ( k ) components.
3. PRESS Calculation & Selection: * Compute the total PRESS for reconstruction: ( PRESSk = \sum{i=1}^{N} \lVert xi - \hat{x}{-i, k} \rVert^2 ). * The optimal ( k{opt} ) is the value that minimizes ( PRESSk ) or where the scree plot of ( PRESS_k ) shows a distinct elbow.
A robust variation of this protocol involves identifying and excluding outliers during the PRESS calculation to prevent them from distorting the component selection [13].
Workflow Visualization
The following diagram illustrates the logical sequence and decision points in the cross-validation workflow for component selection.
Diagram 1: Cross-validation workflow for PCA component selection.
Data Presentation and Interpretation
Example Output and Analysis
The following table simulates output from a 10-fold cross-validation on a PCR analysis, similar to that obtained from the RMSEP function in R [75]. The CV MSE (Mean Squared Error) and PRESS values are used to identify the optimal model.
Table 2: Example Cross-Validation Output for Principal Component Regression
| Number of Components (k) | CV MSE | PRESS | Cumulative Variance Explained | Recommended |
|---|---|---|---|---|
| 0 | 488.0 | 107,360 | 0.0% | |
| 1 | 386.2 | 84,964 | 35.2% | |
| 2 | 387.3 | 85,206 | 52.8% | |
| 3 | 387.0 | 85,140 | 65.1% | |
| 4 | 387.9 | 85,338 | 73.5% | |
| 5 | 390.9 | 85,998 | 80.1% | |
| 6 | 383.8 | 84,436 | 84.9% | |
| 7 | 382.5 | 84,150 | 88.3% | Optimal (k_opt) |
| 8 | 388.0 | 85,360 | 90.9% | |
| 9 | 388.1 | 85,382 | 93.0% | |
| 10 | 385.2 | 84,744 | 94.6% | Overfitting |
Interpretation: The analysis indicates that ( k_{opt} = 7 ) is the optimal number of principal components, as it yields the minimum PRESS value (84,150). It is noteworthy that while 6 components capture a substantial amount of variance (84.9%), the model's predictive accuracy, as measured by PRESS, continues to improve slightly with the 7th component. This highlights a key advantage of the cross-validation approach: it can identify components that, while explaining little additional variance, contribute meaningfully to prediction. Conversely, adding components beyond 7 leads to an increase in PRESS, a classic sign of overfitting where the model begins to fit noise in the training data.
The Scientist's Toolkit
This section details the essential computational tools and resources required to implement the described protocols.
Table 3: Research Reagent Solutions for PCA Cross-Validation
| Tool / Resource | Type | Primary Function | Example / Note |
|---|---|---|---|
| R Statistical Environment | Software Platform | Comprehensive environment for statistical computing and graphics. | Base R provides the prcomp and princomp functions for PCA [13]. |
pls R Package |
Software Library | Implements PCR and Partial Least Squares (PLS) with built-in cross-validation. | The pcr() function simplifies the workflow in Protocol 1, and RMSEP() extracts the PRESS statistic [75]. |
| Python Scikit-Learn | Software Library | Machine learning library with PCA, regression, and cross-validation modules. | The decomposition.PCA and model_selection.cross_val_score functions can be combined. |
| Efficient CV Algorithms | Computational Method | Speeds up leave-one-out cross-validation for PCA without full recomputation. | Leverages "eigenvalue downdating" to avoid costly recalculations, as noted by Mertens et al. [74]. |
| USDA FNDDS Dataset | Example Dataset | A real-world, high-dimensional dataset for demonstrating protocols. | Contains 57 nutritional variables for 8,690 food items, ideal for exploratory PCA [76]. |
| Parallel Analysis Scripts | Supplementary Code | Provides an alternative/complementary method for component selection. | R code for parallel analysis is available to compare with CV results [6]. |
Within the broader context of research on selecting the optimal number of principal components (PCs) using scree plots, this protocol addresses a critical validation step: linking component selection directly to the performance of downstream predictive tasks. Principal Component Analysis (PCA) is a cornerstone dimensionality reduction technique in biomedical research, widely used to analyze complex high-dimensional datasets such as patient health records, genetic data, and medical imaging [30] [10]. The primary challenge researchers face is determining the optimal number of principal components (PCs) to retain—a decision that profoundly impacts the information content carried forward into subsequent analyses.
While traditional scree plot analysis provides a visual method for identifying the "elbow point" where eigenvalues level off [13], this approach suffers from subjectivity and lacks objective connection to final analytical outcomes [30]. This application note provides a structured framework to bridge this methodological gap, using logistic regression for disease prediction as a representative downstream task. By systematically evaluating how different component retention thresholds affect predictive accuracy, researchers can make data-driven decisions that optimize both model performance and interpretability.
Theoretical Foundation
Principal Component Analysis in Biomedical Research
PCA transforms potentially correlated variables into a smaller set of uncorrelated variables called principal components, which capture the maximum variance in the data [10]. The first principal component (PC1) represents the direction of maximum variance, with subsequent components capturing remaining orthogonal variance in descending order [10]. In healthcare applications, PCA helps summarize essential health indicators from multiple clinical variables, enabling efficient patient stratification and personalized treatment approaches [30].
Logistic Regression for Disease Prediction
Logistic regression remains a cornerstone technique in clinical risk prediction due to its interpretability and robust framework for handling binary outcomes [77]. It models the probability of a binary outcome (e.g., disease present vs. absent) using the logistic function, which transforms linear combinations of input features into probabilities between 0 and 1 [78]. When combined with PCA, logistic regression benefits from reduced multicollinearity and lower-dimensional feature spaces, potentially enhancing model generalizability [10].
Component Selection Methods
The optimal number of principal components represents a critical hyperparameter in the analytical workflow. Table 1 summarizes the primary methods for determining component retention.
Table 1: Methods for Selecting the Number of Principal Components
| Method | Description | Advantages | Limitations |
|---|---|---|---|
| Scree Plot | Visual identification of the "elbow" where eigenvalues level off [13] | Intuitive; widely supported in statistical software | Subjective interpretation; inconsistent between raters [30] |
| Kaiser-Guttman Criterion | Retains components with eigenvalues >1 [30] | Simple objective threshold | Tends to select too many components with many variables, too few with few variables [30] |
| Percent Cumulative Variance | Retains components explaining a set variance percentage (typically 70-80%) [4] [30] | Directly controls information retention | Arbitrary threshold selection; may retain irrelevant variance [30] |
| Performance-Based Validation | Selects components that optimize downstream task performance (e.g., classification accuracy) [4] | Directly links dimensionality reduction to analytical goals | Computationally intensive; requires validation framework |
Experimental Protocol
The following diagram illustrates the complete experimental workflow for linking component selection to downstream predictive performance:
Data Preprocessing and PCA Transformation
Materials:
- Dataset with continuous variables (e.g., clinical measurements, biomarker levels)
- Statistical software with PCA capabilities (R, Python, SAS, SPSS)
Procedure:
- Standardize variables: Center and scale all continuous variables to mean = 0 and standard deviation = 1 to prevent bias toward variables with larger scales [10].
- Handle missing data: Implement appropriate imputation strategies (e.g., multiple imputation) or remove observations with excessive missingness, as PCA requires complete data matrices [79].
- Perform PCA: Apply PCA to the correlation matrix (for standardized data) or covariance matrix (for unstandardized data) to extract eigenvalues and eigenvectors.
- Extract components: Retain all possible components initially for evaluation (e.g., using
PCA(n_components=None)in Python's Scikit-learn) [4].
Component Selection Methods
Scree Plot Implementation:
- Generate scree plot: Plot eigenvalues against corresponding component numbers [13].
- Identify elbow: Locate the point where the slope of the curve distinctly changes and levels off.
- Record selection: Note the number of components at this elbow point for subsequent validation.
Kaiser-Guttman Criterion:
- Calculate eigenvalues: Extract eigenvalues from the PCA solution.
- Apply threshold: Retain all components with eigenvalues greater than 1.0 [30].
- Record selection: Note the number of components meeting this criterion.
Variance Threshold Approach:
- Calculate cumulative variance: Compute the cumulative proportion of variance explained by successive components.
- Apply threshold: Retain the minimum number of components that explain at least 80% of total variance [4] [30].
- Record selection: Note the number of components meeting this variance threshold.
Downstream Task Validation
Logistic Regression Implementation:
- Dataset splitting: Partition data into training (70%), validation (15%), and test (15%) sets, preserving class distributions in each split.
- Model training: For each component selection method, train logistic regression models using the corresponding component scores as predictors.
- Performance assessment: Evaluate each model on the validation set using multiple metrics (Table 2).
- Iterative refinement: Adjust the number of components around each method's recommendation (±2 components) to identify potential improvements.
- Final validation: Apply the best-performing model to the held-out test set for unbiased performance estimation.
Table 2: Performance Metrics for Model Validation
| Metric | Formula | Interpretation |
|---|---|---|
| Accuracy | (TP+TN)/(TP+TN+FP+FN) | Overall correctness of predictions |
| Area Under ROC Curve (AUC) | Area under ROC curve | Overall discriminative ability |
| Precision | TP/(TP+FP) | Accuracy of positive predictions |
| Recall (Sensitivity) | TP/(TP+FN) | Ability to detect true positives |
| F1-Score | 2×(Precision×Recall)/(Precision+Recall) | Harmonic mean of precision and recall |
| Root Mean Square Error (RMSE) | √[Σ(yᵢ-ŷᵢ)²/n] | Magnitude of prediction errors |
Case Study Application
Breast Cancer Prediction Example
A practical implementation of this protocol was demonstrated in research predicting breast cancer using PCA with logistic regression [10]. The study utilized six clinical attributes: meanradius, meantexture, meanperimeter, meanarea, mean_smoothness, and diagnosis. Following the experimental protocol:
- PCA was applied to the first five continuous variables after standardization.
- Multiple component retention thresholds were evaluated using the methods in Section 3.3.
- Logistic regression models were trained using the component scores from each threshold approach.
- Predictive performance was compared across approaches to identify the optimal number of components.
This systematic approach allowed researchers to balance dimensionality reduction with predictive accuracy, creating a more robust and interpretable classification model.
Multiple Sclerosis Severity Score Development
In another biomedical application, researchers developed a Multiple Sclerosis (MS) severity score using PCA on claims data [80]. The PC1 score (first principal component) was developed using diagnoses, drug prescriptions, and procedures related to functional systems for the Expanded Disability Status Scale (EDSS). The resulting score effectively stratified patients into severity quartiles that aligned with clinical expectations—higher scores correlated with older age, longer disease duration, and increased healthcare utilization [80]. This demonstrates how PCA-derived components can serve as meaningful disease severity proxies in downstream analyses.
The Scientist's Toolkit
Table 3: Essential Research Reagents and Computational Tools
| Item | Specifications | Application Purpose |
|---|---|---|
| Statistical Software | R (prcomp, psych, syndRomics packages) or Python (scikit-learn) | PCA implementation and visualization |
| Data Visualization Tools | Scree plots, cumulative variance plots, syndromic plots | Component selection and interpretation |
| Validation Frameworks | k-fold cross-validation, bootstrap validation | Model performance assessment |
| Covariance Estimation Methods | Ledoit-Wolf estimator, pairwise differences estimation | Stable estimation in high-dimensional settings |
| Component Stability Assessment | Non-parametric permutation methods, bootstrap resampling | Reproducibility analysis of component solutions |
Interpretation Guidelines
Analytical Decision Framework
When implementing this protocol, several interpretive considerations ensure valid conclusions:
Performance-accuracy tradeoffs: While more components typically retain more original information, beyond a certain point additional components may capture noise rather than signal, potentially reducing generalizability [4].
Clinical versus statistical significance: A statistically optimal component count should also align with clinical interpretability. Components should reflect biologically or clinically meaningful patterns where possible [80] [79].
Stability assessment: Evaluate component robustness through resampling techniques (e.g., bootstrapping) implemented in packages like
syndRomics[79]. Reproducible components across samples increase confidence in results.Multiple comparison adjustment: When testing multiple component thresholds, apply appropriate multiple testing corrections (e.g., Bonferroni, FDR) to avoid inflated Type I errors.
Troubleshooting Common Issues
- Flat scree plots: When no clear elbow exists, prioritize variance-based or performance-based selection methods over visual interpretation [30].
- Multicollinearity persistence: If logistic regression still shows variance inflation factors (VIF) >10 after PCA, consider additional regularization (ridge logistic regression).
- Class imbalance: For datasets with unequal class representation, supplement accuracy with precision, recall, and F1-score for comprehensive evaluation [77].
- Small sample sizes: In high-dimension, low-sample-size settings (n < p), consider regularized covariance estimation methods [30] to stabilize PCA solutions.
This application note provides a validated framework for linking principal component selection directly to downstream predictive performance in disease prediction models. By systematically comparing traditional scree plot analysis with variance-based and performance-driven approaches, researchers can make empirically grounded decisions about dimensionality reduction. The integrated protocol—combining PCA with logistic regression validation—ensures that component retention decisions enhance rather than compromise analytical goals. This methodology is particularly valuable in biomedical contexts where both predictive accuracy and model interpretability are essential for clinical translation.
This application note provides a detailed protocol for applying Principal Component Analysis (PCA) to a high-dimensional clinical cytokine dataset, replicating and validating the methodology used in the seminal study by Witteveen et al. on traumatic brain injury (TBI) [81]. We focus on the critical step of selecting the optimal number of principal components using the scree plot criterion, a core requirement for ensuring the biological validity and statistical robustness of the findings. The procedures outlined herein—covering data pre-processing, multivariate analysis, and interpretation—are designed to equip researchers with a framework for analyzing complex humoral inflammatory responses in a clinical context.
In clinical studies involving a large number of interrelated biomarkers, such as the 42 cytokines analyzed in Traumatic Brain Injury (TBI) research, traditional univariate statistical methods are often flawed [81]. They struggle with high statistical co-variance and fail to capture the underlying structure of the data. Multivariate projection methods like PCA overcome these limitations by transforming the original correlated variables into a smaller set of uncorrelated principal components (PCs) that capture the greatest variance in the data [81] [7].
The work by Witteveen et al. demonstrates the successful application of PCA to decipher distinct phases of the inflammatory response in TBI from cerebral microdialysis data [81]. A pivotal part of this analysis is determining how many PCs to retain for meaningful interpretation, a process for which the scree plot is a fundamental tool. This case study provides a step-by-step protocol to replicate this analytical validation, with a particular emphasis on scree plot methodology within a broader thesis on optimal component selection.
Materials and Methods
Research Reagent Solutions and Key Materials
The table below catalogs essential materials and reagents required to conduct cytokine analysis and multivariate modeling as described in Witteveen et al. [81].
Table 1: Essential Research Reagents and Materials
| Item | Function/Description |
|---|---|
| CMA71 Microdialysis Catheters | High molecular weight cut-off (100 kDa) catheters for collecting cerebral extracellular fluid. |
| Human Albumin Solution (3.5%) | Perfusion fluid for microdialysis, compatible with the CNS environment. |
| Milliplex MAP Human Cytokine/Chemokine Panel | A 42-plex magnetic bead kit for simultaneous quantification of 42 inflammatory mediators via Luminex technology. |
| Luminex 200 System | Analyzer for multiplexed immunoassays, detecting multiple cytokines in a single sample. |
| SIMCA-P+ Software | Multivariate data analysis software for performing PCA, PLS-DA, and related projection methods. |
Experimental Workflow and Data Collection Protocol
Patient Cohort and Ethical Considerations
- Patient Selection: enroll patients with a consistent clinical presentation, such as severe TBI (Glasgow Coma Score ≤ 8) and a diffuse injury mechanism [81].
- Ethics Approval: secure approval from the relevant Research Ethics Committee prior to initiation. The study protocol must include informed consent procedures, typically obtained from next of kin [81] [82].
Biological Sample Collection
- Cerebral Microdialysis: insert microdialysis catheters into the brain parenchyma. Perfuse with 3.5% Human Albumin Solution at a low flow rate (e.g., 0.3 µL/min). Collect and pool microdialysate samples over defined epochs (e.g., 6-hour periods) for up to 5 days post-injury [81].
- Plasma Sampling: collect peripheral blood samples (e.g., from an arterial line) into EDTA tubes twice daily. Centrifuge to isolate plasma and store aliquots at -80°C until analysis [81].
Cytokine Profiling
- Multiplex Immunoassay: analyze microdialysate and plasma samples in duplicate using a predefined panel (e.g., Milliplex 42-plex kit) on the Luminex platform [81].
- Data Quality Control: run a fresh standard curve on each assay plate to convert fluorescence intensities into cytokine concentrations.
Data Preprocessing for Multivariate Analysis
- Data Structuring: compile data into a single matrix where rows represent individual observations (e.g., a patient at a specific time point) and columns represent the measured cytokine concentrations [81] [83].
- Handling Missing Data: note timepoints where samples were not collected (e.g., during medical imaging) as 'missing'. The NIPALS algorithm, used in software like SIMCA-P+, can handle datasets with missing values [81].
- Data Scaling: prior to PCA, mean-center and scale each cytokine variable to unit variance. This step is critical to give all variables equal weight, regardless of their original concentration scales [81].
Core Protocol: Principal Component Analysis and Scree Plot Validation
This protocol details the steps for performing PCA and determining the optimal number of components.
Step 1: Perform Principal Component Analysis
- Use multivariate analysis software (e.g., SIMCA-P+) to perform PCA on the preprocessed data matrix.
- The software will generate a set of principal components (PCs), each a linear combination of the original cytokines, and calculate the variance explained by each PC.
Step 2: Generate and Interpret the Scree Plot
- Create a scree plot, which is a line segment plot with the component number on the x-axis and the corresponding eigenvalue (or the percentage of variance explained) on the y-axis [7].
- The plot will typically show a downward curve, with the first few PCs explaining most of the variance [7].
Step 3: Select the Optimal Number of Components
- Primary Criterion (Elbow Method): identify the "elbow" or point of inflection on the scree plot where the curve flattens out. Retain all components just before this elbow point [7]. This represents the transition from components that capture signal to those that represent noise.
- Supplementary Criteria:
- Validate the chosen number by ensuring it yields biologically interpretable component loadings.
Step 4: Model Validation and Follow-up Analysis
- Validate the stability of the PCA model using cross-validation techniques (e.g., 7-fold cross-validation as in Witteveen et al.) to calculate a Q² statistic [81].
- For temporal analysis, pool data into time bins (e.g., 0-48h, 48-96h) and use Partial Least Squares Discriminant Analysis (PLS-DA) to maximize the separation between these time-based classes [81].
The following diagram illustrates the logical workflow and decision points for the scree plot validation process.
Diagram 1: Scree plot analysis workflow for component selection.
Results and Data Interpretation
The following tables summarize key quantitative aspects of a PCA analysis based on the referenced studies.
Table 2: Example Cytokine Panel for PCA (Adapted from [81])
| Cytokine Abbreviation | Cytokine Full Name |
|---|---|
| IL-1β, IL-1ra, IL-6, IL-8, IL-10 | Interleukins (Pro- & Anti-inflammatory) |
| TNF | Tumour Necrosis Factor |
| MCP-1, MIP-1α, MIP-1β | Chemokines |
| VEGF | Vascular Endothelial Growth Factor |
| G-CSF, GM-CSF | Colony Stimulating Factors |
Table 3: Criteria for Selecting Principal Components
| Method | Description | Application Note |
|---|---|---|
| Scree Plot (Elbow) | Visual identification of the point where the slope of the curve sharply decreases. | Subjective but primary method; look for the "rock pile" at the mountain's base [7]. |
| Eigenvalue > 1 | Retain components with an eigenvalue greater than 1. | A more objective rule; can over- or under-estimate in some cases [7]. |
| Proportion of Variance | Retain enough components to explain a pre-specified % of total variance (e.g., 80%). | Ensures a sufficient amount of data structure is captured [7]. |
Interpretation of Principal Components
- Component Loadings: after identifying the significant PCs, examine the loadings (correlations between original variables and the PC). Cytokines with high absolute loadings on a single PC are interpreted as a co-regulated cluster [81].
- Biological Insight: in the TBI study, specific patterns of cytokine production revealed distinct phases of the humoral inflammatory response and differing responses between brain and blood [81]. This would not be apparent through univariate analysis.
- Score Plots: plot patient samples in the space defined by the first few PCs (e.g., PC1 vs. PC2) to identify outliers, clusters, or temporal trajectories.
Discussion
Technical and Biological Validation
Applying PCA with a rigorously validated number of components, as outlined in this protocol, allows researchers to move beyond simplistic correlations. It enables the identification of co-expressed cytokine clusters that reflect underlying biological pathways [81]. This approach successfully identified distinct inflammatory phases in TBI, demonstrating its utility for summarizing complex datasets and generating robust hypotheses [81].
The scree plot criterion, while potentially subjective when multiple elbows exist, remains a cornerstone of component selection when used in conjunction with other criteria [7]. Its strength lies in providing a visual representation of the variance structure, guiding researchers toward a parsimonious model.
Anticipated Problems and Troubleshooting
- Poorly Defined Scree Plot: if the scree plot lacks a clear elbow, rely more heavily on the Kaiser criterion and the proportion of variance explained [7].
- Data Quality: the presence of outliers or excessive missing data can distort the PCA. Robust scaling and the use of algorithms like NIPALS that handle missing data are essential [81].
- Biological Interpretation: a component that is statistically significant but biologically uninterpretable should be re-examined. This may indicate over-fitting or the influence of technical artifacts. Adherence to clinical research guidelines for data management and quality assurance is crucial throughout the process [84] [85].
This application note provides a validated, detailed protocol for applying PCA to clinical cytokine data, with a specific focus on determining the optimal number of components via scree plot analysis. By following this workflow, researchers can reliably uncover the multivariate patterns embedded within high-dimensional biomarker data, leading to more profound and clinically relevant biological insights.
Principal Component Analysis (PCA) serves as a foundational dimensionality reduction technique in data-driven biological research. However, the selection of the optimal number of principal components (PCs) presents a critical decision point that extends beyond statistical output. This Application Note establishes a standardized protocol for integrating statistical metrics with domain expertise and biological plausibility assessments to guide this selection process. We provide a structured framework that enables researchers to validate their dimensionality reduction choices against established biological knowledge, thereby enhancing the reliability and interpretability of PCA outcomes in drug discovery and development contexts.
In the analysis of high-dimensional biological data, Principal Component Analysis (PCA) is a widely used statistical method for simplifying complex datasets while retaining critical patterns [86] [87]. The technique transforms correlated variables into a new set of uncorrelated variables called principal components, which are ordered by the amount of variance they explain from the original data [29]. A fundamental challenge in applying PCA lies in determining the optimal number of components to retain—a decision that balances statistical efficiency with interpretive value.
The concept of biological plausibility refers to the coherence of analytical results with established biological mechanisms and clinical expectations [88]. In pharmaceutical research, the failure to account for biological plausibility can lead to significant resource misallocation. Recent evidence demonstrates that clinical trials lacking strong genetic support for the therapeutic hypothesis are significantly more likely to terminate due to lack of efficacy or safety concerns [89]. This underscores the critical importance of grounding analytical decisions, including PCA component selection, in biologically realistic frameworks.
This Application Note addresses the integration of domain knowledge with statistical methodologies for PCA component selection, with particular emphasis on applications in drug development pipelines. We present a standardized protocol that enables researchers to justify their analytical choices through both quantitative metrics and biological reasoning.
The Statistical Foundation: Scree Plots and Component Selection
Understanding PCA and Scree Plots
PCA operates by identifying new axes (principal components) that capture the maximum variance in the data [86]. The first principal component (PC1) represents the direction of maximum variance, with each subsequent component capturing the next highest variance under the constraint of orthogonality to previous components [87]. The scree plot provides a visual representation of this variance structure, displaying eigenvalues (representing the amount of variance explained) against the corresponding component number [13].
The scree plot enables researchers to identify an "elbow point"—a distinct change in slope where subsequent components explain progressively smaller proportions of variance [86] [13]. This elbow represents the subjective point of diminishing returns for including additional components, serving as a common heuristic for component selection.
Quantitative Methods for Component Selection
While the scree plot offers visual guidance, several quantitative approaches supplement this analysis:
- Kaiser Criterion: Retains components with eigenvalues greater than 1 [6] [90]. This approach often overestimates dimensionality but provides a useful baseline [6].
- Cumulative Variance Threshold: Retains the number of components required to explain a predetermined percentage of total variance (commonly 70-90%) [91].
- Parallel Analysis: Compares data eigenvalues against those derived from uncorrelated random data, retaining components where data eigenvalues exceed random eigenvalues [6].
Table 1: Statistical Methods for Selecting Principal Components
| Method | Description | Advantages | Limitations |
|---|---|---|---|
| Scree Plot (Elbow Method) | Visual identification of the point where eigenvalues plateau | Intuitive; Reveals variance structure | Subjective; Requires judgment call |
| Kaiser Criterion | Retains components with eigenvalues > 1 | Simple objective rule | Often overestimates components |
| Cumulative Variance | Retains components to meet a set variance threshold (e.g., 80-90%) | Ensures minimum variance explained | Threshold is arbitrary; May retain noise |
| Parallel Analysis | Compares eigenvalues to those from random data | Objective; Reduces overfitting | Requires simulation; More complex |
The Crucial Integration: Biological Plausibility and Domain Knowledge
Defining Biological and Clinical Plausibility
In the context of analytical modeling, biological and clinical plausibility can be defined as "predicted estimates that fall within the range considered plausible a-priori, obtained using a-priori justified methodology" [88]. This definition emphasizes the importance of establishing expectations before analysis and validating outputs against biologically realistic constraints.
The pharmaceutical industry provides compelling evidence for this approach. Recent research analyzing 28,561 stopped clinical trials found that studies terminated for negative outcomes (e.g., lack of efficacy) showed significant depletion of genetic evidence supporting the therapeutic hypothesis [89]. This demonstrates how prior biological knowledge can predict experimental outcomes and highlights the risks of ignoring biological plausibility in analytical workflows.
A Framework for Plausibility Assessment
The DICSA approach (Define, Information Collection, Comparison, Set Expectations, Assess Alignment) provides a systematic process for integrating biological plausibility into analytical decisions [88]. Adapted for PCA component selection, this framework involves:
- Define the biological context and analytical objectives
- Collect relevant biological information and prior knowledge
- Compare variance patterns with established biological understanding
- Set pre-specified expectations for biologically plausible components
- Assess how statistical outputs align with biological knowledge
This process formalizes what expert researchers often do intuitively—validating statistical patterns against domain knowledge to ensure results are both mathematically sound and biologically meaningful.
Application Notes and Protocols
Integrated Protocol for PCA Component Selection
This protocol provides a step-by-step framework for determining the optimal number of principal components by integrating statistical metrics with biological plausibility assessment.
Table 2: Research Reagent Solutions for PCA in Biological Contexts
| Tool/Category | Example | Function in Analysis |
|---|---|---|
| Statistical Software | R (prcomp, princomp), Python (scikit-learn), MATLAB (pca()), H2O (h2o.prcomp()) |
Performs PCA computation, generates eigenvalues, and creates scree plots [87] [90] [29]. |
| Biological Databases | Open Targets Platform, ClinVar, Genomic England PanelApp, GWAS Catalogs | Provides genetic evidence to assess biological plausibility of components [89]. |
| Visualization Tools | ggplot2 (R), Matplotlib (Python), Biplots | Creates scree plots and visualizes component loadings for interpretation [87] [29]. |
Phase 1: Data Preparation and Initial Statistical Analysis
- Standardize Data: Standardize all features to have a mean of 0 and variance of 1 to prevent variables with large ranges from dominating the analysis [86] [29].
- Perform PCA: Execute PCA using preferred statistical software, retaining all possible components initially [87].
- Generate Scree Plot: Create a scree plot visualizing eigenvalues against component number [13].
- Calculate Variance Metrics: Compute the proportion of variance explained by each component and the cumulative variance [91].
Phase 2: Statistical Component Selection
- Identify Elbow Point: Examine the scree plot to visually identify the point where the slope clearly changes [86] [13].
- Apply Kaiser Criterion: Note components with eigenvalues greater than 1 [6].
- Determine Variance Threshold: Calculate how many components are needed to explain 70-90% of cumulative variance [91].
- Document Statistical Recommendations: Record the component numbers suggested by each statistical method.
Phase 3: Biological Plausibility Assessment
- Examine Component Loadings: Analyze the variable loadings for the top components identified in Phase 2 [29].
- Map to Biological Pathways: Identify whether high-loading variables correspond to known biological pathways, gene networks, or clinical features [89].
- Assess Clinical Coherence: Evaluate whether the variance structure aligns with clinical understanding of disease subtypes or treatment responses [88].
- Consult Domain Experts: Review findings with subject matter experts to validate biological interpretability.
Phase 4: Integrated Decision Making
- Compare Recommendations: Tabulate component numbers suggested by statistical methods alongside biological interpretability assessments.
- Select Optimal Range: Identify the component range that satisfies both statistical criteria and biological plausibility.
- Document Justification: Record the rationale for final component selection, including both statistical and biological reasoning.
- Validate Stability: Conduct sensitivity analyses to ensure components remain stable across data subsamples.
Workflow Visualization
The following diagram illustrates the integrated protocol for selecting principal components:
Integrated PCA Component Selection Workflow
Case Study Example: Genomic Data Analysis
Consider a PCA application on genomic data from a clinical trial population:
Background: A Phase II oncology trial investigating a novel targeted therapy collected transcriptomic data from 150 patients.
Application of Protocol:
Statistical Analysis: Initial PCA revealed 8 components with eigenvalues >1, while the scree plot elbow occurred at component 5, which captured 68% of cumulative variance.
Biological Validation: Examination of component loadings showed that:
- Component 1 represented genes involved in immune response pathways
- Component 2 captured cell cycle progression genes
- Component 3 corresponded to metabolic pathway genes
- Components 4-5 represented stress response pathways relevant to the mechanism of action
- Components 6-8 showed no coherent biological interpretation
Integrated Decision: Despite the statistical recommendation of 8 components by the Kaiser criterion, biological assessment supported retaining only 5 components, which adequately captured the clinically relevant biological processes while excluding potentially noisy dimensions.
Outcome: The 5-component solution provided a biologically interpretable framework for subsequent survival analyses, revealing that patients with specific component profiles showed significantly better treatment response, consistent with the drug's proposed mechanism of action.
The selection of principal components in PCA represents a critical analytical decision that should transcend purely statistical considerations. By integrating scree plot analysis with rigorous biological plausibility assessment, researchers can develop dimensionality reduction solutions that are both mathematically sound and biologically meaningful. The protocol presented in this Application Note provides a standardized framework for this integration, emphasizing the importance of contextual domain knowledge in validating statistical outputs. As drug discovery increasingly relies on complex multidimensional data, such integrated approaches will be essential for generating clinically actionable insights and reducing attrition in therapeutic development.
Conclusion
Selecting the optimal number of principal components via a scree plot is a fundamental yet nuanced skill in the analysis of high-dimensional biomedical data. A successful strategy combines the visual intuition of the scree plot with robust validation from complementary methods like parallel analysis and cumulative variance. By mastering this process, researchers and drug developers can effectively simplify complex datasets, build more generalizable models, and uncover the latent structures that drive biological processes and clinical outcomes. Future directions include the integration of scree plot methodology with non-linear dimensionality reduction techniques and its expanded application in personalized medicine and biomarker discovery for improved diagnostic and therapeutic strategies.
References
- 1. Digital medicine and the curse of dimensionality - PMC [https://pmc.ncbi.nlm.nih.gov/articles/PMC8553745/]
- 2. Precision medicine and the cursed dimensions [https://www.nature.com/articles/s41746-019-0081-5]
- 3. Evaluating dimensionality reduction for genomic prediction [https://pmc.ncbi.nlm.nih.gov/articles/PMC9614092/]
- 4. How to Select the Best Number of Principal Components ... [https://towardsdatascience.com/how-to-select-the-best-number-of-principal-components-for-the-dataset-287e64b14c6d/]
- 5. Top 12 Dimensionality Reduction Techniques for Machine ... [https://encord.com/blog/dimentionality-reduction-techniques-machine-learning/]
- 6. r - Choosing number of principal components to retain [https://stats.stackexchange.com/questions/44060/choosing-number-of-principal-components-to-retain]
- 7. Scree Plot. Principal Component Analysis (PCA) is a… [https://sanchitamangale12.medium.com/scree-plot-733ed72c8608]
- 8. Principal Component Analysis (PCA): Explained Step-by- ... [https://builtin.com/data-science/step-step-explanation-principal-component-analysis]
- 9. Scree plot [https://en.wikipedia.org/wiki/Scree_plot]
- 10. What Is Principal Component Analysis (PCA)? [https://www.ibm.com/think/topics/principal-component-analysis]
- 11. Interpret all statistics and graphs for Principal Components ... [https://support.minitab.com/en-us/minitab/help-and-how-to/statistical-modeling/multivariate/how-to/principal-components/interpret-the-results/all-statistics-and-graphs/]
- 12. Exploring Principal Component Analysis (PCA) [https://bioinformaticamente.com/2025/03/11/exploring-principal-component-analysis-pca/]
- 13. Scree Plot - an overview [https://www.sciencedirect.com/topics/mathematics/scree-plot]
- 14. Principal Component Analysis [https://www.spectrochempy.fr/userguide/analysis/pca.html]
- 15. Sage Research Methods - Scree Plot [https://methods.sagepub.com/ency/edvol/sage-encyclopedia-of-educational-research-measurement-evaluation/chpt/scree-plot]
- 16. The Scree Test For The Number Of Factors. [https://www.semanticscholar.org/paper/The-Scree-Test-For-The-Number-Of-Factors.-Cattell/379df72de684003963f11427c97490a8c2d2a593]
- 17. Principal component analysis [https://en.wikipedia.org/wiki/Principal_component_analysis]
- 18. Principal Component Analysis (PCA) in R Tutorial [https://www.datacamp.com/tutorial/pca-analysis-r]
- 19. The scree test for the number of factors (1966) [https://scispace.com/papers/the-scree-test-for-the-number-of-factors-4iiygtfcp5]
- 20. Decision of the Optimal Rank of a Nonnegative Matrix ... [https://www.sciencedirect.com/org/science/article/pii/S2563357023000065]
- 21. An heuristic scree plot criterion for the number of factors [https://link.springer.com/article/10.1007/s00362-023-01517-x]
- 22. Principal Components Analysis (PCA) in Python [https://jmausolf.github.io/code/pca_in_python/]
- 23. How to interpret graphs in a principal component analysis [https://blogs.sas.com/content/iml/2019/11/04/interpret-graphs-principal-components.html]
- 24. . scree : plot the eingenvalues of an MDS analysis in bios2mds... Plots [https://rdrr.io/cran/bios2mds/man/scree.plot.html]
- 25. On the Use of Elbow Plot Method for Class Enumeration in ... [https://pmc.ncbi.nlm.nih.gov/articles/PMC12092417/]
- 26. Principal Component Analysis: A Method for Determining ... [https://pmc.ncbi.nlm.nih.gov/articles/PMC4676806/]
- 27. Scree plot [https://grokipedia.com/page/Scree_plot]
- 28. Interpreting PCA Results | CodeSignal Learn [https://codesignal.com/learn/courses/navigating-data-simplification-with-pca-1/lessons/interpreting-pca-results]
- 29. Issue #91 - Principal Component Analysis (PCA) [https://mlpills.substack.com/p/issue-91-principal-component-analysis]
- 30. Optimizing PCA for Health and Care Research: A Reliable ... [https://arxiv.org/html/2503.24248v1]
- 31. What Is Principal Component Analysis (PCA) and How It Is ... [https://www.sartorius.com/en/knowledge/science-snippets/what-is-principal-component-analysis-pca-and-how-it-is-used-507186]
- 32. Normalizing vs Scaling before PCA - Cross Validated [https://stats.stackexchange.com/questions/385775/normalizing-vs-scaling-before-pca]
- 33. Understanding Principal Component Analysis (PCA) [https://medium.com/@roshmitadey/understanding-principal-component-analysis-pca-d4bb40e12d33]
- 34. Using Fuzzy C-Means clustering and PCA in public health [https://www.sciencedirect.com/science/article/pii/S2352914825000541]
- 35. Eigenvectors, Eigenvalues, and Covariance Matrix Explained [https://codesignal.com/learn/courses/navigating-data-simplification-with-pca/lessons/mastering-pca-eigenvectors-eigenvalues-and-covariance-matrix-explained]
- 36. Eigenvalues (Scree) Plot - STATISTICS WITH PRISM 10 [https://www.graphpad.com/guides/prism/latest/statistics/stat_pca_example_scree_plot.htm]
- 37. Guidelines for retaining principal components - The DO Loop [https://blogs.sas.com/content/iml/2017/08/02/retain-principal-components.html]
- 38. Ten quick tips for effective dimensionality reduction - PMC [https://pmc.ncbi.nlm.nih.gov/articles/PMC6586259/]
- 39. FactoMineR and factoextra : Principal Component Analysis ... [https://www.sthda.com/english/wiki/wiki.php?id_contents=7851]
- 40. How to Create a Scree Plot in Python (Step-by-Step) [https://www.statology.org/scree-plot-python/]
- 41. Principal Components Analysis with Python (Sci-Kit Learn) [https://www.datasklr.com/principal-component-analysis-and-factor-analysis/principal-component-analysis]
- 42. Principal Component Analysis [https://www.codecademy.com/article/principal-component-analysis-intro]
- 43. How to Use the Scree Plot in PCA for Data Analysis [https://www.linkedin.com/advice/1/what-scree-plot-pca-how-can-you-use-analyze-your-data-j4ktc]
- 44. Dimension reduction techniques for the integrative analysis of ... [https://pmc.ncbi.nlm.nih.gov/articles/PMC4945831/]
- 45. Protocol to analyze and validate transcriptomic changes in ... [https://pmc.ncbi.nlm.nih.gov/articles/PMC9846014/]
- 46. Chapter 4 Dimensionality reduction, redux [https://bioconductor.org/books/3.18/OSCA.advanced/dimensionality-reduction-redux.html]
- 47. Concept | Principal Component Analysis (PCA) [https://knowledge.dataiku.com/latest/ml-analytics/statistics/concept-principal-component-analysis-pca.html]
- 48. 12.6 - Final Notes about the Principal Component Method [https://online.stat.psu.edu/stat505/lesson/12/12.6]
- 49. Determining an Adequate Number of Principal Components [https://www.intechopen.com/chapters/81645]
- 50. Elements must meet minimum color contrast ratio thresholds [https://dequeuniversity.com/rules/axe/4.8/color-contrast]
- 51. Accessibility Bytes No. 2: Color Contrast [https://www.section508.gov/blog/accessibility-bytes/color-contrast/]
- 52. PCA - Principal Component Analysis Essentials - Articles [https://www.sthda.com/english/articles/31-principal-component-methods-in-r-practical-guide/112-pca-principal-component-analysis-essentials/]
- 53. An Exploratory Analysis of the Internal Structure of Test ... [https://pmc.ncbi.nlm.nih.gov/articles/PMC9187369/]
- 54. 3 PCA on the multidrug study | mixOmics vignette [https://mixomicsteam.github.io/mixOmics-Vignette/id_03.html]
- 55. Principal Component Analysis (PCA) [https://www.geeksforgeeks.org/data-analysis/principal-component-analysis-pca/]
- 56. Principal Component Analysis (PCA) Made Easy [https://medium.com/@sahin.samia/principal-component-analysis-pca-made-easy-a-complete-hands-on-guide-e26a3680c0bc]
- 57. Scree plot: $m$ vs $m-1$ components/factors - Cross Validated [https://stats.stackexchange.com/questions/513911/scree-plot-m-vs-m-1-components-factors]
- 58. Using a Supervised Principal Components Analysis for ... [https://pubmed.ncbi.nlm.nih.gov/40459332/]
- 59. Principal component analysis: a review and recent ... [https://pmc.ncbi.nlm.nih.gov/articles/PMC4792409/]
- 60. Principal Components - an overview [https://www.sciencedirect.com/topics/mathematics/principal-components]
- 61. 3.3 Validation: stability and significance | Principal Component ... [https://pca4ds.github.io/validation-stability-and-significance.html]
- 62. Principal Component Analysis limitations and how to ... [https://ekamperi.github.io/mathematics/2021/02/23/pca-limitations.html]
- 63. The advantages and disadvantages of using Kaiser Rule to ... [https://stats.stackexchange.com/questions/253535/the-advantages-and-disadvantages-of-using-kaiser-rule-to-select-the-number-of-pr]
- 64. Common mistakes in PCA and how to avoid them [https://microbiozindia.com/common-mistakes-in-pca-and-how-to-avoid-them/]
- 65. Understanding Principal Component Analysis (PCA) [https://medium.com/@piyushkashyap045/understanding-principal-component-analysis-pca-e73c7810bbab]
- 66. Parallel Analysis in Factor Analysis [https://www.statstodo.com/ParallelAnalysis.php]
- 67. Combining Parallel and Exploratory Factor Analysis in ... [https://pmc.ncbi.nlm.nih.gov/articles/PMC4610406/]
- 68. How many factors in factor analysis? New insights about ... [https://www.sciencedirect.com/science/article/abs/pii/S0148296321006603]
- 69. How to correctly interpret a parallel analysis in exploratory ... [https://stats.stackexchange.com/questions/97802/how-to-correctly-interpret-a-parallel-analysis-in-exploratory-factor-analysis]
- 70. A Comparison of Methods for Determining the Number ... [https://www.mdpi.com/2624-8611/5/3/67]
- 71. Kaiser Rule [https://docs.displayr.com/wiki/Kaiser_Rule]
- 72. Chapter 16 Factor Analysis and CSF | Visualizing Data for ... [https://smin95.github.io/dataviz/factor-analysis-and-csf.html]
- 73. Principal Components (PCA) and Exploratory Factor Analysis ... [https://stats.oarc.ucla.edu/spss/seminars/efa-spss/]
- 74. The efficient cross-validation of principal components ... [https://link.springer.com/article/10.1007/BF00142664]
- 75. Obtaining the number of components from cross validation of ... [https://statisticaloddsandends.wordpress.com/2018/10/15/obtaining-the-number-of-components-from-cross-validation-of-principal-components-regression/]
- 76. 6 Principal Component Analysis [https://vdsbook.com/06-pca]
- 77. Clinical Risk Prediction with Logistic Regression [https://academic-med-surg.scholasticahq.com/article/131964-clinical-risk-prediction-with-logistic-regression-best-practices-validation-techniques-and-applications-in-medical-research]
- 78. Logistic Regression in Machine Learning [https://www.geeksforgeeks.org/machine-learning/understanding-logistic-regression/]
- 79. Reproducible analysis of disease space via principal ... [https://elifesciences.org/articles/61812]
- 80. A Principal Component Analysis Approach to Estimate the ... [https://pmc.ncbi.nlm.nih.gov/articles/PMC8857383/]
- 81. Principal Component Analysis of the Cytokine and Chemokine ... [https://pmc.ncbi.nlm.nih.gov/articles/PMC3382168/]
- 82. Recommended format for a 'research protocol' [https://www.who.int/groups/research-ethics-review-committee/recommended-format-for-a-research-protocol]
- 83. Application of Principal Component Analysis to ... [https://www.sciepublish.com/article/pii/533]
- 84. Instructions for Preparing Clinical Research Study Datasets for ... [https://www.nhlbi.nih.gov/grants-and-training/policies-and-guidelines/guidelines-for-preparing-clinical-study-data-sets-for-submission-to-the-nhlbi-data-repository]
- 85. Clinical Research Guidelines and Tools [https://drexel.edu/research/compliance/guidelines-procedures/clinical-research-guidelines-tools]
- 86. Unlocking Insights with Principal Analysis Component [https://www.numberanalytics.com/blog/unlocking-insights-with-pca]
- 87. Chapter 17 Principal Components Analysis - · Bradley Boehmke [https://bradleyboehmke.github.io/HOML/pca.html]
- 88. Defining Biological and Clinical Plausibility: The DICSA ... [https://pmc.ncbi.nlm.nih.gov/articles/PMC12167276/]
- 89. Genetic factors associated with reasons for clinical trial ... [https://www.nature.com/articles/s41588-024-01854-z]
- 90. How Principal Analysis in MATLAB Can Make Your... Component [https://www.theacademicpapers.co.uk/blog/2025/09/29/principal-component-analysis-in-matlab/]
- 91. Scree plot - Principal component analysis (PCA) [https://analyse-it.com/docs/user-guide/multivariate/scree-plot]